doors
Car door locks and trunk lids (tailgate) opened with the same key. The delivery set includes 2 such keys.
Unlocking car doors
Outside:
- insert the key into the lock cylinder and turn it so that the blocking button rises.
From the inside:
- pull up the lock button.
Opening car doors
Outside:
- push up the lock handle and. pull it towards you to open the door.
From the inside:
- pull the handle of the lock and squeezing away, open the door.
Locking car doors
Outside:
- close the door, insert the key into the lock cylinder and turn it so. so that the blocking button is lowered, or on an open door, lift the handle of the lock, drown the blocking button and slam the door.
From the inside:
- push the lock button.
NOTE: If the door is open, the lock button can only be lowered by holding the outside or inside handle in the open position.
On five-door vehicles, in order to prevent accidental opening of the rear doors, an additional blocking device is provided, the flag of which is located on the end surface of the rear door at the level of the lock cylinder. The lock is blocked by lowering the flag.
Centralized door lock system
Ford vehicles «Escort» And «Orion» can also be equipped with a centralized electric door lock system, while the front passenger door lock and the fifth door lock can be opened with a key independently of the centralized system.
Every 10,000 km of run, it is necessary to check the operation of the door hinges, hood, trunk (fifth door), stops, larvae and guides and lubricate them if necessary.
To lubricate the hinge pin, remove the plastic cap from the top of the pin, put a few drops of oil into the hole, and replace the cap.
Front seats
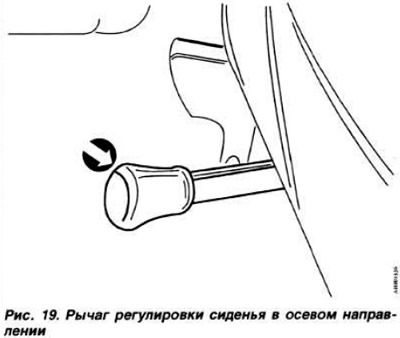
The front seats can move longitudinally and have an adjustable backrest. Adjusting the position of the front seats in the longitudinal direction:
- sit on the seat (left/right);
- push the lever to the right (pic. 19)
- pushing / pushing the seat, set it to the desired position;
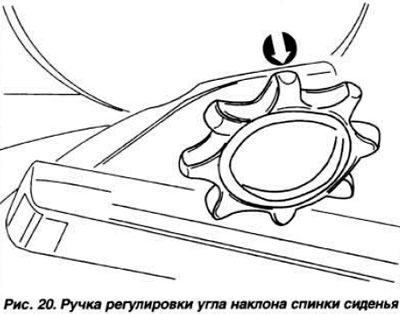
- lock the seat in this position by releasing the lever Adjusting the angle of the backrest: sit on the seat and. handwheel (pic. 20) clockwise or counterclockwise, give the backrest the desired angle of inclination.
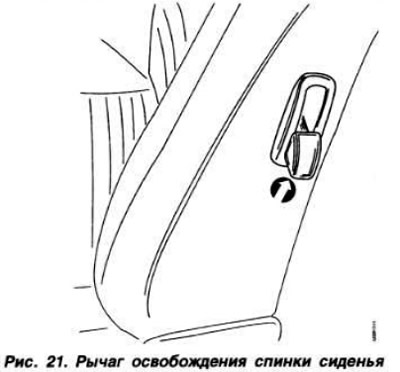
The design of the front seats of some models allows you to fully recline the backrest They are easily distinguished from standard seats by the lever mounted on the side of the backrest (pic. 21).
Luggage compartment
The luggage compartment is equipped with a removable shelf to accommodate small items. The shelf is removed in the following order:
- unfasten the belts;
- remove the guides from the brackets and remove the shelf.
The design of the rear seat allows you to significantly expand the volume of the luggage compartment by performing the following operations: pull loop 1 (pic. 22) and put the rear seat cushion upright (for a five-door body, both rear side doors should be slightly opened):
- unfasten the belts and remove the shelf from the side brackets;
- pull up the levers 4 and fold the backrest of the rear seat forward.
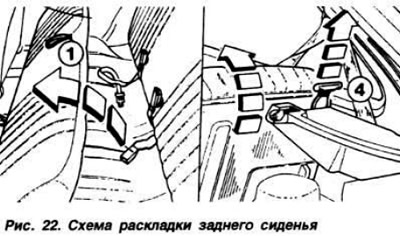
ATTENTION: When performing all operations on the rear seat cushion and backrest, the position of the seat belts must be observed.
Sunroof
If there is a sunroof in the car roof, its opening is carried out by turning the lever counterclockwise, and closing - by turning the lever clockwise.
The tilt angle of the sunroof is adjusted by turning the lever clockwise past the fixed position point.
NOTE: At high vehicle speeds with the sunroof open, a noticeable air rarefaction can be created in the passenger compartment. To avoid this phenomenon, the dampers of the side nozzles of the heating and ventilation system should be opened.
If there is a sun visor, then the design of its drive allows you to set the visor to the desired position both with the sunroof open and closed.
Roll-down glass doors
Lowering and raising of glasses is carried out by rotation of the handle located on an internal surface of doors.
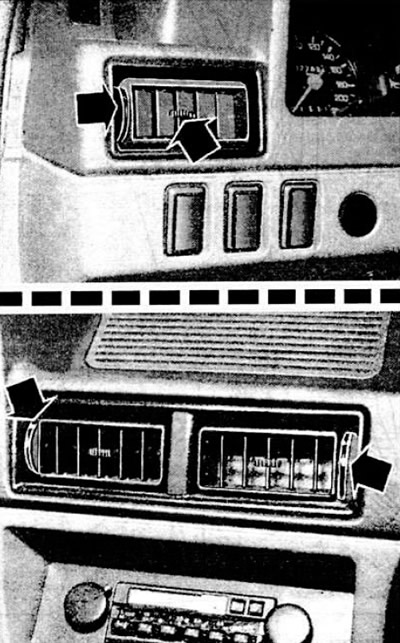
Central ventilation nozzles
Opening and closing of the dampers of the central nozzles of the interior heating and ventilation system is carried out with the help of handles, the cylindrical surface of which has a knurling. The temperature of the air coming from the turned on heater is regulated by the degree of opening of the tap and the fan operation mode (pic. 23).
Side ventilation nozzles
The side nozzles are designed to take in outside air and supply it to the vehicle interior. The flaps of the side nozzles of the interior heating and ventilation system are opened and closed using handles located on the side, the cylindrical surface of which is knurled.
The direction of the air jet coming from the side nozzles is adjusted by moving it using the central handle. It is recommended to always keep the flaps of the central and side nozzles open (the amount of air entering the passenger compartment is determined by the speed of the car).
Electric fan
The electric fan is designed to create forced air flows in the car interior and is controlled by a three- or two-position switch. To turn on the electric fan, you need to turn the knob of its switch clockwise and set it to one of three fixed positions - I - low rotation speed; II - average speed of rotation; III - maximum rotation speed.
To turn off the electric fan, just turn its knob counterclockwise until it stops.
Heater
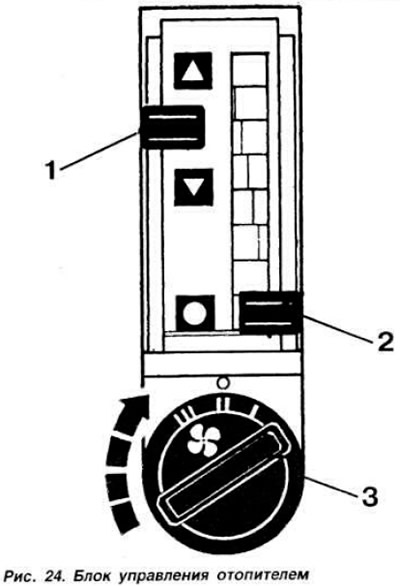
Heater control unit (pic. 24) located in the center of the instrument panel and consists of two levers moving in a vertical plane:
1 - air damper control lever.
2 - control lever of the heater valve:
3 - electric fan switch.
Air flow control is carried out with the help of dampers, which are set to the appropriate position by lever 1 (right). When lever 1 is installed on the upper white triangle, the air flow goes to the windshield and the non-adjustable side heating nozzles of the front doors, and when installed on the lower triangle, to the feet of the passengers and the non-adjustable front door glass heating nozzles.
When the lever is located between the triangles, part of the air flow goes to the windshield, and part - to the legs of the passengers, respectively, the specific position of the lever.
When the lever is placed between the lower triangle and the white dot, small amounts of air continue to flow to the windshield and into the lower part of the cabin.
Setting lever 1 to the lowest position (to the white dot) means complete closing of the air dampers of the heater. The heater valve is fully closed when lever 2 is moved down to the stop, and fully open when lever 2 (left) moved all the way up. As the lever moves up, there is an increase in the flow of hot liquid into the radiator of the heater and an increase in the temperature of the air flow.
Visitor comments