Contents: Removal ↳ Installation ↳
Note: Refer to previous Sections, if necessary, for details on disconnecting accessories and fittings.
Removal
1. Remember that internal faults in an automatic transmission can only be successfully identified when the transmission is in the vehicle. Therefore, consult with a Ford dealer or other specialist whenever you remove the transmission unless your sole purpose is to replace the transmission.
2. Disconnect the negative battery cable.
3. Apply the parking brake, jack up the front of the vehicle and support it on supports.
4. Release the clips and remove the lower engine soundproofing cover, which consists of two parts.
5. On engines with the air cleaner mounted directly to the intake manifold, remove the air cleaner assembly as described in Chapter 4.
6. Contact Chapter 8 and remove the driveshaft.
7. Remove the starter as described in Chapter 5.
8. Disconnect the exhaust pipe from the exhaust manifold and muffler, remove it through the bottom of the car.
9. Disconnect the speedometer cable at the rear of the transmission. On models with a tachograph, disconnect the electronic tachograph wiring.
10. Working from the cab side, move the gear shift lever to the "N" position.
11. Working under the vehicle, disconnect the gear selector cable from the ball stud on the gear shift lever. Remove the two bolts and set the shift cable bracket and cable aside.
12. Disconnect the downshift valve wiring from the cable connector.
13. Disconnect the wiring from the starter interlock switch.
14. Disconnect the vacuum hose from the vacuum diaphragm.
15. After removing the transmission fluid dipstick, unscrew the retaining bolt and remove the level measuring tube. Close the opened hole in the gearbox with a plug.
16. Wipe the surfaces adjacent to the coolant tube connections on the right side of the gearbox, then unscrew and remove the tubes (see figure 15.16). After closing the holes in the gearbox that opened after removing the tubes and the tubes themselves with plugs, put the tubes aside.
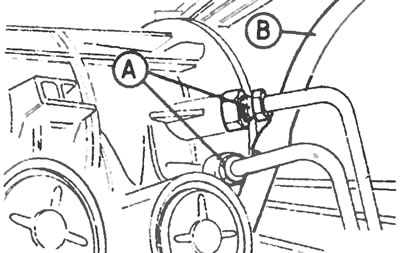
Figure 15.16. Connection points of the transmission fluid radiator tubes (A) and the transmission fluid supply tube into the system (B).
17. Working through the hole left by removing the starter, unscrew the four nuts securing the drive plate to the torque converter; in this case, it is necessary to turn the engine shaft with a wrench placed on the crankshaft groove pulley bolt in order to gain access to each of these bolts (see Figure 15.17).
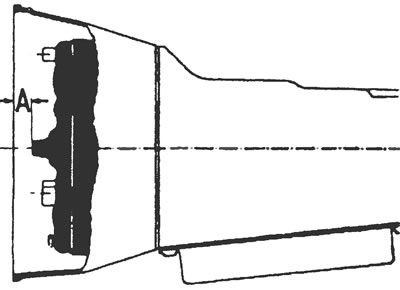
Figure 15.17. Fastening the elastic faceplate of the automatic transmission to the torque converter: A - Flywheel and ring gear, B - Flexible faceplate, C - Torque converter, D - Bolt securing faceplate to flywheel, E - Union nut, F - Bolt securing flywheel to crankshaft, G - Nut securing faceplate to torque converter.
18. Unscrew the fixing bolts and nuts and separate the gearbox mounts to the engine from the torque converter housing.
19. Unscrew the two bolts and separate the connecting plate from the torque converter housing.
20. Jack up the gearbox with a jack, placing it under the gearbox pan; to avoid damaging the pan, place a wooden block between it and the jack, making sure beforehand that the gearbox cannot slip during the following steps.
21. Remove the single bolt securing the gearbox mount to the crossmember and the two bolts on each side securing the crossmember to the underbody. Then remove the cross beam.
22. Similarly, using a jack and a block, support the rear of the engine below the oil pan.
23. Remove the torque converter housing retaining bolts and carefully move the transmission rearward to separate the torque converter bushing from the crankshaft adapter. Have an assistant assist you during this process to support the transmission on the jack and to hold the torque converter inside the transmission.
24. Carefully separate the gearbox from the engine and lower it down to remove it from the vehicle. Once the gearbox is removed, secure the torque converter against the gearbox to prevent it from falling out. If this happens, be prepared for a significant amount of fluid to spill due to the torque converter separating from the transmission fluid pump. To lock the torque converter in its position once the transmission has been removed, place a suitable locking bar across the front flange face of the transmission.
Installation
25. Install the automatic transmission in reverse order, paying attention to the following:
- a) After installing the torque converter on the gearbox and connecting it to the transmission oil pump drive gear, make sure that the distance between the face of the torque converter flange and the edge of the torque converter housing is at least 21 mm (see Figure 15.25);
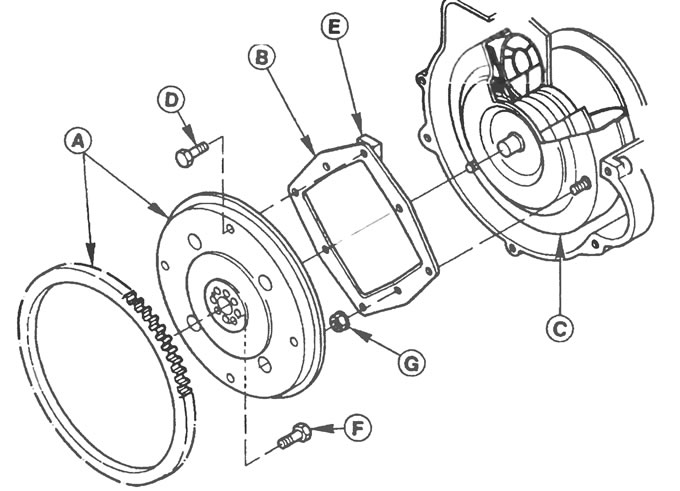
Figure 15.25. Installing the torque converter: A = minimum 21 mm.
- b) Hold the gearbox in a slightly tilted rear position during installation to avoid the torque converter falling out;
- c) Once the transmission is installed, insert the torque converter dowel pins through the holes in the faceplate;
- d) After connecting the gearbox to the engine completely, make sure that the torque converter rotates freely, then insert the bolts securing the torque converter housing to the engine flange and tighten them to the tightening torque specified in the specification;
- d) Adjust the downshift and gear selector cables as described in Sections 4 and 5;
- f) Install the starter as described in Chapter 5;
- g) Install the propeller shaft as described in Chapter 8;
- h) If removed, install the air filter as described in Chapter 4;
- k) When finished, fill the box with transmission fluid.
For more information, please visit the website: Fordbook.ru