Contents: Removal ↳ Installation ↳
Removal
1. With the parking brake applied, jack up the front of the vehicle and support it on jack stands.
2. Release the clips and remove the lower engine soundproofing cover, which consists of two parts.
3. Clean the area around the connection between the transmission pan and the transmission case, then unscrew the eighteen bolts and carefully remove the pan. Since the pan is still full of transmission fluid, be prepared for some spillage (and continuous dripping after removing the tray).
4. Unscrew the rear servo cover and remove the cover and gasket. Remove the servo piston and spring (see Figure 10.4).
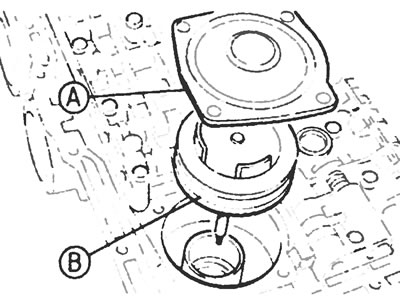
Figure 10.4. Servo cover (A) and piston (B) after removing the transmission pan.
5. Separate the O-ring from the servo piston. Purchase new: O-ring, servo cover gasket and pan gasket - you will need them during installation.
6. Drain the liquid from the pan, then clean the pan completely and wipe it with a lint-free cloth.
Make sure all traces of old gasket are removed from the mating surfaces of the transmission and oil pan
Installation
7. After lubricating the new servo piston O-ring with clean transmission fluid, install it into the piston groove.
8. Insert the piston and spring into the crankcase and install the cover with a new gasket
9. Insert the new pan gasket into the installation position, then install the pan. Tighten the pan bolts in two equal stages to the specified torque
10. Install the lower engine sound deadening cover and lower the vehicle to the ground.
11. Fill the transmission with the specified transmission fluid in accordance with Chapter 1.
The original article can be viewed on the portal: FORDBOOK.RU