Contents: Removal ↳ Installation ↳
Removal
1. With the parking brake applied, jack up the front of the vehicle and support it on supports.
2. Release the clips and remove the lower engine soundproofing cover, which consists of two parts.
3. After releasing the vacuum hose retaining clamp, pull the hose off (if installed) from the diaphragm nipple.
4. Loosen the retaining bolt and separate the vacuum diaphragm assembly along with the retaining bracket from the transmission. Pull out the control pin, being careful not to allow the throttle valve piston to fall out when removing the diaphragm (see figure 9.4).
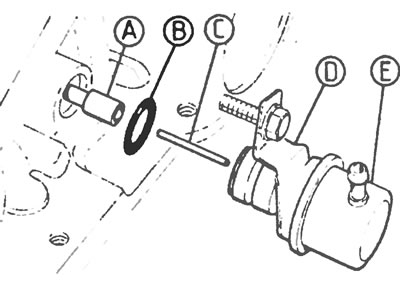
Figure 9.4. Vacuum diaphragm parts and fastening: A - Throttle valve piston, B - O-ring, C - Drive pin, D - Mounting bracket, E - Vacuum diaphragm.
5. Separate the O-ring from the diaphragm assembly; you will need a new seal when installing.
Installation
6. Lubricate the new O-ring and place it into the groove of the diaphragm assembly.
7. Make sure the throttle valve piston moves freely within the valve inner diameter, then insert the control pin.
8. Install the diaphragm, secure it with the fixing bolt, and connect the vacuum hose.
9. Install the lower engine sound deadening cover and lower the vehicle to the ground.
10. Check the level and, if necessary, add transmission fluid, relying on Chapter 1.
This article was borrowed from the website [FORDBOOK.ru]