Contents: Removal ↳ Installation ↳
Removal
1. With the parking brake applied, jack up the front of the vehicle and support it on jack stands.
2. Release the clips and remove the lower engine soundproofing cover, which consists of two parts.
3. From the cabin side, unscrew the two screws and remove the lower protective cover of the gear selector lever. Remove the backlight bulb socket and peel off the cover.
4. Hook and release the end connection of the cable from the ball stud on the gear shift lever. Remove the retaining ring and disconnect the cable with the sheath from the gear shift mechanism.
5. Working from underneath the vehicle, unscrew the four nuts and remove the gear selector mechanism retaining frame (see Figure 6.5).
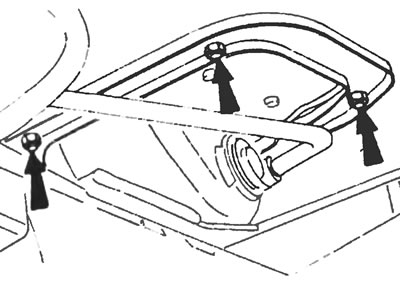
Figure 6.5. Fastening nuts (indicated by arrows) support frame of the gear selection mechanism.
6. Remove the gear selector mechanism from inside the cabin.
Installation
7. Installation is carried out in the reverse order of removal. Once completed, move the gearshift lever through all positions to ensure that engagement is secure. If necessary, adjust the cable as described in the previous section.
For more information, please visit the website (www.fordbook.ru)