Please note: On vehicles with a long downshift cable, a special Ford tool #17-031 must be used to adjust the cable. This tool is essentially a piece of metal with a fork on the end used to slightly bend the cable during adjustment, creating a five-point curve. A replacement for this tool is easily made at home. An assistant is required to adjust both long and short cables.
Cars with a long downshift cable
1. With the parking brake applied, jack up the front of the vehicle and support it on jack stands.
2. Release the clips and remove the lower engine soundproofing cover, which consists of two parts.
3. Ask an assistant to turn on the ignition (with the gearshift lever in any position), but do not start the engine. Now have your assistant press the accelerator pedal all the way down and hold it in that position so that the downshift valve is engaged the entire time you are making the adjustment while under the vehicle.
4. Move the downshift lever towards the gearbox counterclockwise as far as possible.
5. Position the special tool (or an alternative of our own production) in the middle of the cable (see figure 3.5).
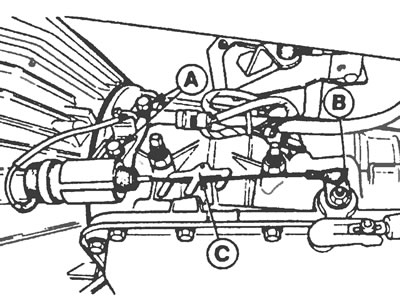
Figure 3.5. Adjusting the downshift cable: A - Relief valve fixing bolts; B - Transmission downshift lever; C - Special tool "Ford" No. 17-031.
6. Loosen the two pressure reducing valve retaining bolts. Move the valve toward the front of the vehicle until resistance becomes noticeable and the cable becomes taut. If the valve is moved too far, the cable will become slack again. If this happens, repeat paragraphs 3 through 6.
7. While holding the valve in this position, tighten the two retaining bolts.
8. After removing the special tool, have your assistant release the accelerator pedal and make sure the downshift lever returns to its original position. Turn off the ignition.
9. Now you should check the correct adjustment of the cable as follows. If the adjustment is done correctly, the valve will pull and hold the reduction lever in the correct position for as long as it is engaged (the gas pedal is fully pressed, the ignition is on). However, it should still be possible to manually move the gearshift lever counter-clockwise another 0.3-0.8 mm before it actually stops mechanically.
10. If the cable is too tight, the valve will initially turn on when you press the gas pedal, but will not be able to stay in the on position, and the downshift lever will immediately return to its original position. If the setting is only slightly different from the correct one, the valve will engage and hold the lever for the first time, but as it heats up along with the car during operation, the energy of the valve holding the coil will decrease, which will also cause the lever to return to its original position. Both of these conditions can only be detected during a road test, but if either condition is detected, i.e. if the transmission does not hold a lower gear even with the accelerator pedal fully depressed and all other transmission readings are correct, a readjustment must be performed.
11. Once complete, install the lower engine sound deadening cover and lower the vehicle to the ground.
Cars with a short downshift cable
12. Follow all procedures described above in paragraphs 1 through 6.
13. Move the valve back approximately 0.5 mm until the cable tension is just released (the reduction lever should still be in the extreme counterclockwise position).
14. Holding the valve in this position, tighten the two retaining bolts.
15. Ask your assistant to release the accelerator pedal and make sure that the downshift lever returns to its original position. Turn off the ignition.
16. Now you should check the correct adjustment of the cable as follows. If the adjustment is made correctly, the valve will pull and hold the reduction lever in the correct position as long as it is engaged (the gas pedal is fully pressed, the ignition is on). However, it should still be possible to manually move the gearshift lever counter-clockwise another 0.3-0.8 mm before it actually stops mechanically.
17. If the cable adjustment is incorrect, you will encounter the conditions described above in paragraph 10. In this case, you should readjust it.
18. Once complete, install the lower engine sound deadening cover and lower the vehicle to the ground.