Contents: Vacuum testing ↳ Regulation ↳
Please note: a pressure gauge is required for checking and adjusting.
Vacuum testing
1. Disconnect the hose from the vacuum diaphragm outlet nipple on the regulator and connect a pressure gauge to the nipple (see Figure 11.1).
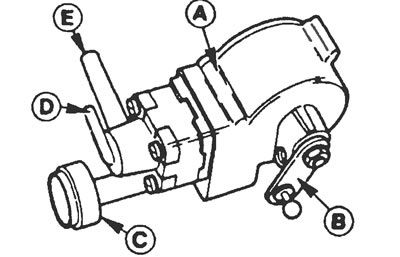
Figure 11.1. Vacuum regulator: A - Vacuum regulator assembly, B - Regulator control lever, C - Release valve, D - Adapter to brake vacuum pump, E - Adapter to vacuum diaphragm assembly.
2. With the gear shift lever in position "P", start the engine and let it idle at normal idle speed.
3. Check the pressure gauge readings and compare them with those given in Specifications.
4. Stop the engine and disconnect the fuel pump control mechanism from the governor control lever.
5. Start the engine again (gear lever still in the "P" position) and turn the governor control lever counterclockwise as far as possible.
6. Check the pressure gauge readings and compare them with the full load reference values given in Specifications.
7. If any of the readings differ significantly from those given in the Specifications, the regulator must be replaced.
8. After turning off the engine, remove the pressure gauge. Reconnect the original hose and check that the control mechanism is adjusted correctly as follows.
Regulation
9. Move the throttle rod toward the fuel pump to the full load position and turn the governor control lever counterclockwise until it stops.
10. Make sure that the rod engages with the ball-end stud on the lever. If necessary, adjust the rod, then install it on the governor control lever.
(The original version can be found on the website: «fordbook.ru»)