Rear wheel hub
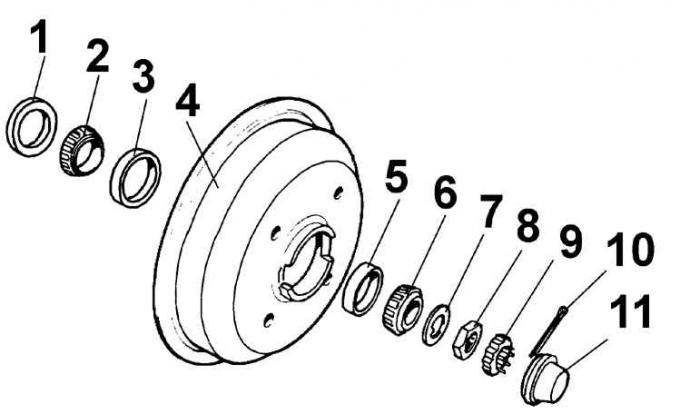
1 – sealing ring; 2 – inner tapered roller bearing; 3 – outer bearing ring; 4 – hub (brake drum); 5 – outer bearing ring; 6 – outer tapered roller bearing; 7 – thrust washer; 8 – nut; 9 – Nut lock; 10 – cotter pin; 11 – dust cap
Removal
1. Loosen the wheel bolts, raise and secure the rear of the car on stands and remove the wheel.
2. Remove the dust cap from the central hub mounting nut and remove the cotter pin.
3. Unscrew the nut, remove the nut retainer, thrust washer and remove the hub (brake drum) by pulling it towards you.
4. Remove the outer sealing ring.
5. Remove the tapered roller bearings from the hub.
6. Carefully knock the outer bearing rings out of the hub. Knock out the outer bearing ring first.
7. Remove any remaining old grease from the hub and axle housing.
Installation
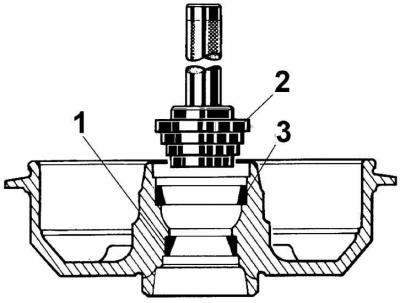
1. Install the outer rings of the hub bearings using tool 15-051 or a suitable mandrel (1 – outer ring of the outer bearing, 2 – tool 15-051, 3 – outer ring of the inner bearing).
2. Fill the inside of the new bearings with grease and install the inner bearing and sealing ring onto the hub.
3. Install the hub on the axle, being careful not to damage the working edges of the sealing ring.
4. Install the outer bearing, thrust washer and screw on the nut.
5. Adjust the bearing clearance.
6. Install the wheel and lower the vehicle.
Adjusting the bearing play
Adjustment of play is performed when installing hub bearings or if there is play in the wheel on a car with high mileage.
1. Loosen the wheel bolts, raise and secure the rear of the vehicle on stands and remove the wheel. The parking brake must not be applied.
2. Remove the dust cap from the central hub mounting nut, remove the cotter pin and nut retainer.
3. Tighten the hub nut to a torque of 20–25 Nm while simultaneously rotating the hub counterclockwise.
4. Unscrew the nut by half a turn and screw it again by hand until it stops. Check for axial play, keeping in mind that the play cannot be completely removed.
5. Install the nut retainer so that two of its slots align with the cotter pin holes.
6. Insert a new cotter pin, spread its ends around the retainer and install the dust cap in place.
7. Install the wheel and lower the vehicle.
For more information, please visit the website fordbook