Contents: Symptoms of problems with the brake… ↳ Brake lines and hoses ↳ Front disc brakes ↳ Rear drum brakes ↳ Parking brake ↳ Lubrication ↳ Examination ↳
Note: In addition to regular checks, the brake system should be inspected whenever a tire is changed or when it malfunctions. From a safety perspective, checking the brake system is the most important procedure when servicing your vehicle.
Symptoms of problems with the brake system
1. Disc brake pads are equipped with built-in indicators, which, at a certain level of wear, emit a high-frequency squealing or grinding sound. As soon as you hear such a sound, change the pads immediately, otherwise the brake discs may be damaged.
2. Any of the following symptoms may indicate impending brake failure:
- the car pulls to one side when the brake pedal is pressed
- the brakes make a squealing or rubbing noise when in use
- the brake pedal travel is very large
- the pedal pulsates, brake fluid leaks are visible (usually from the inside of the tire or wheel)
If any of these symptoms are noticeable, have your brake system checked immediately.
Brake lines and hoses
Note: The brake system uses steel lines, with the exception of the flexible hoses on the front wheels and the connectors to the rear axle. It is very important to check these lines periodically.
3. Place the vehicle on a level surface and turn off the engine.
4. Remove the wheel caps. Loosen, but do not remove, the lug nuts on all four wheels.
5. Raise the vehicle and support it securely on jack stands.
6. Remove the wheels (see "Jacking and towing").
7. Check all brake hoses and pipes for cracks, peeling of the outer coating, leaks, abrasions and swelling. Check all threaded ends for leaks and make sure that the mounting bolts and clamps of the brake hoses are intact.
8. If any damage or leaks are found, they should be identified immediately. Detailed information on repairing the brake system is provided in chapter 9.
Front disc brakes
9. Raise the front of the vehicle and support it securely on jack stands. Apply the parking brake and remove the front wheels.
10. Inspect the disc brake caliper and pads. Each caliper has an inner and outer pad - all of them need to be checked.
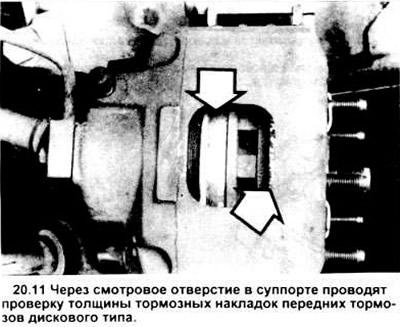
11. The thickness of the pad is determined visually by looking through the hole in the caliper (see figure). The pads should be replaced if the thickness of the cover material is less than or equal to (1/8 inch), or if longitudinal stripes are visible on them along the entire length (see chapter 9). Remember that the covering material (linings) is riveted or attached to a metal plate (block) - therefore the thickness of the metal is not taken into account when measuring.
12. Check the condition of the brake disc. Look for deep scratches, nicks and burnt areas (they look discolored or blue). If damage or wear is noticed, the disc is removed and restored or replaced with a new one. More detailed inspection and repair procedures are discussed in chapter 9.
Rear drum brakes
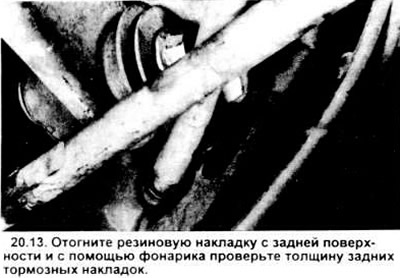
13. The thickness of the brake linings is checked after the rubber lining covering the inspection hole has been bent back (see figure). A complete check requires removal of the brake drums, as described below.
14 Remove the rear brake drums as recommended in Chapter 9.
Warning: As a result of brake lining wear, dust is formed that settles on brake system components. It contains asbestos and is harmful to health. Do not blow it off with compressed air or inhale it. Do not wash off dust with gasoline or solvent. Dust is washed off into the tray using a special brake system cleaner. After wiping the brakes clean with a damp (solvent-soaked) rag, put the rag and solvent in a sealed, designated container. If possible, replace parts with asbestos-free ones.
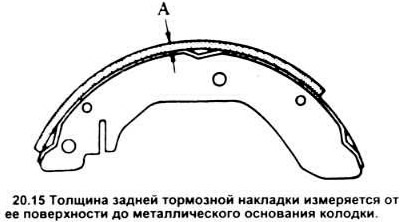
15. Determine the thickness of the lining on the rear brake shoe (see figure) and make sure there are no traces of contamination with brake fluid or grease. If the lining thickness is about (1/16 inch) - from the attachment point or the metal shoe, replace the brake shoes with new ones. The shoes should also be replaced if they are cracked, shiny (shiny surface of the material) or contaminated with brake fluid or grease. The replacement procedure is described in chapter 9.
16. Check the brake shoe return springs and adjuster mechanism to ensure they are properly installed and in working order. Weak or deformed springs, if not replaced, can cause binding and premature lining wear.
17. Check for leaks in the wheel cylinders by carefully peeling off the rubber covers. If brake fluid is found under the cover, the wheel cylinder must be replaced.
18. Check the drums for cracks, nicks, deep scratches and hardened spots that look like slight localized discoloration of the material (See chapter 9).
19. Install the brake drums following the recommendations in chapters 9.
20. Install the wheels, but do not lower the vehicle.
Parking brake
Note: The parking brake cable and linkage should be checked and lubricated periodically. These procedures prevent the parking brake cable adjuster and linkage from binding.
Lubrication
21. Apply the parking brake.
22. Apply multi-purpose grease to the parking brake rod, adjuster assembly, joints and those parts of the parking brake cable that come into contact with other parts of the vehicle (see figure).
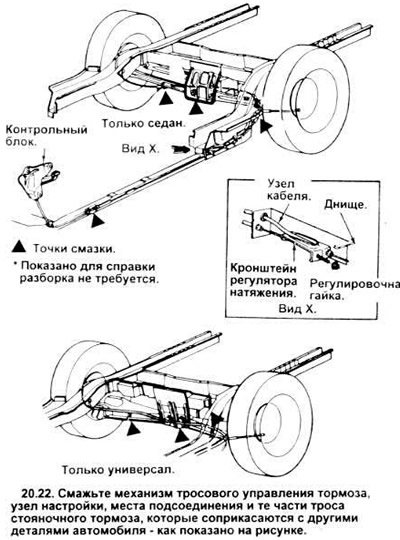
23. Release the parking brake and repeat the lubrication procedure.
24. Remove the jack stands and lower the vehicle.
25. Tighten the vehicle wheel lug nuts.
Examination
26. The simplest method of checking the parking brake is to park the car on a steep slope with the parking brake applied and the gearshift lever in neutral. If the brake fails to prevent the car from rolling, adjust it accordingly chapter 9.
(For more information, please visit the specified website: FordBook)