Warning: in these models of vehicles, the electric fan may operate with the ignition off. When working in the fan area, turn off its motor or disconnect the battery negative cable.
Spark plug wires
Note: Each time before connecting the spark plug wire, distributor cap or coil, a silicone dielectric compound must be applied to the inside of the casing.
1. Spark plug wires should be checked and, if necessary, replaced at the same time as the spark plugs are replaced.
2. The simplest way to detect a defect is a visual inspection of the spark plugs with the engine running. Start the engine in a dark, well-ventilated area and take a look at each of the spark plugs. Be careful not to touch the rotating parts of the engine. If the wire is broken, you will see a glow or a small spark in the damaged area. If you notice this, immediately change the wires
3. The contact wires of the candles should be inspected one by one, starting with the candle of the first cylinder (closest to the right side of the motor), so as not to be confused.
4. Disconnect the contact wire from the first spark plug.
5. Put the wire with the tip back on the lug of the spark plug. He must "sit down" tightly. Otherwise, disconnect it again and use round-nose pliers to lightly crimp the metal contact inside the rubber tip to the desired size.
6. With a clean rag, wipe the wire along the entire length from dirt and grease.
7. Check the cleaned wire for cracks, burnouts and other damage. Do not bend it sharply, otherwise the conductor may break.
8. Disconnect a wire from the distributor. Pull only on the rubber tip. Check for possible corrosion and crimp the contact if necessary. Install the wire back to the distributor.
9. Check each of the remaining spark plug wires, make sure each is securely attached to the distributor and to the appropriate spark plug.
10. If you need new contact wires, purchase a kit specifically for the engine of your modification. It is advisable to take a set of wires with pre-installed rubber tips. To avoid confusion in the ignition sequence, remove and install contact wires one at a time.
Distributor cap and slider
Note: usually every time you replace the contact wires of the spark plugs, it is customary to change the distributor cap with the slider. Therefore, if you change the wires, then change the distributor cap with the slider. But if you plan to use old wires, then be sure to check the condition of the cover and slider.
11. Unscrew the fixing screws and remove the cover from the distributor. Check it for cracks, soot and wear, burnt or loose contacts (see drawing).
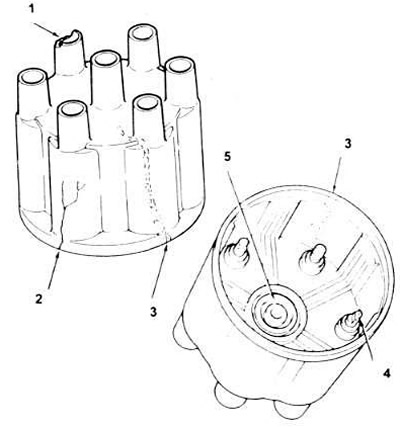
25.11. Here are the most common defects that can be seen when inspecting the distributor cap (if there is any doubt about its performance, it is better to install a new one).
1 Broken support.
2. Crack.
3. A trace of soot.
4. Charred or broken contact.
5. Worn or damaged center contact.
12. Check the slider for cracks and traces of soot. Check that the center mount spring pressure is normal and check the runner head for cracks and wear (see picture).
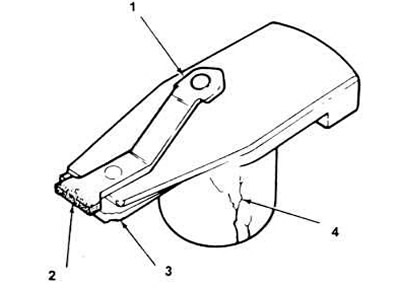
25.12. The ignition runner should be checked for wear and corrosion as shown here (if there is any doubt about the satisfactory condition, it should be replaced).
1. Insufficient spring pressure.
2. Contact corrosion.
3. Scuffs.
4. Cracks.
13. At detection of damages and defects replace a runner and a cover. Remember that the slider is held on the axis with two screws and is installed uniquely (in one position). Before installing the cover, lubricate the slider head with a silicone dielectric compound (see picture).
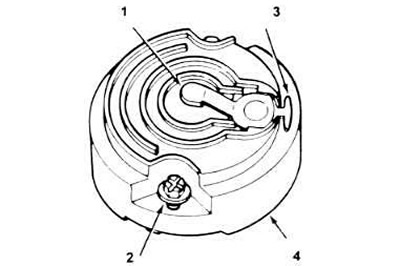
25.13. Before installing the cover, lubricate the slider with silicone dielectric compound.
1. This surface is not coated with the composition.
2. Screw slider holder.
3. Slider.
4. Lubricate the top, bottom and edges of the slider with 8 mm silicone dielectric compound. (1/32 inch) thick.
14. When installing a new cover, disconnect the wires from the old one one at a time and connect them to the new one in the same places - do not remove the wires at the same time, otherwise you can mix up the ignition order.
Visitor comments