Removal
Remove the ground cable from the battery. Drain the engine oil. Refit the oil pan drain plug.
Unscrew the nuts and separate the exhaust pipe from the manifold. The exhaust pipe seal must be replaced with a new one. Hang the exhaust pipe to the body using soft wire. On engines with a catalytic converter, disconnect the connector from the oxygen sensor.
Remove the starter.
Remove the two bolts and remove the clutch housing plate. On Endura-E engines, remove the bolts securing the oil pan tab to the transmission.
On Endura-E models with air conditioning, remove the accessory drive belt, unbolt the compressor from the pan mount, and move the compressor out of the way. Do not disconnect any hoses.
Remove the eighteen bolts that secure the oil pan to the crankcase, then use a pry bar to separate and remove the pan.
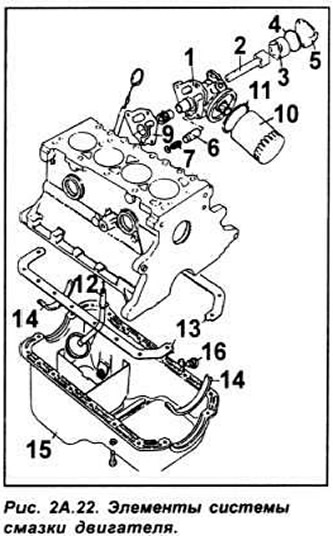
Remove dirt and old gasket from the mating surfaces of the sump and crankcase, and wash the sump before reinstalling it. Check that the oil strainer is clean (see Fig. 2A.22).
Installation. HCS engines
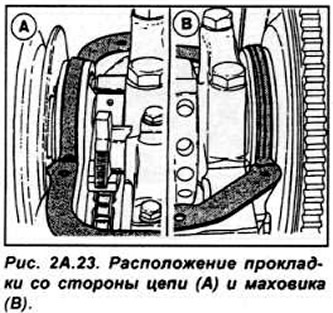
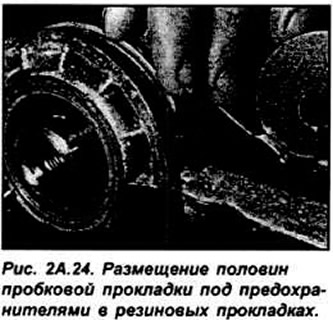
Remove the old gaskets from the chain cover and flywheel side and clean the mating surfaces. Apply sealant to the gasket mounting areas. Install new cork gaskets to the front of the block, using a thick coat of clean grease to secure them, then install new rubber gaskets into the grooves in the chain cover and rear oil seal cover. Place the tabs of the cork gasket halves under the guards in the rubber gaskets (see Fig. 2A.23. 2A.24).
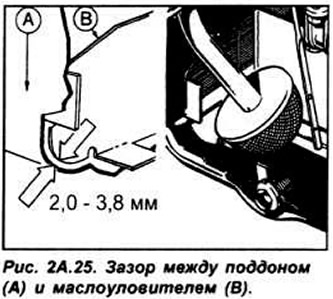
Before installing the pan, check that the gap between the pan and the oil catch can is between 2.0 and 3.8 mm. Do not use a dented or damaged pan, as the specified measurement is important for proper engine lubrication (see Fig. 2A.25).
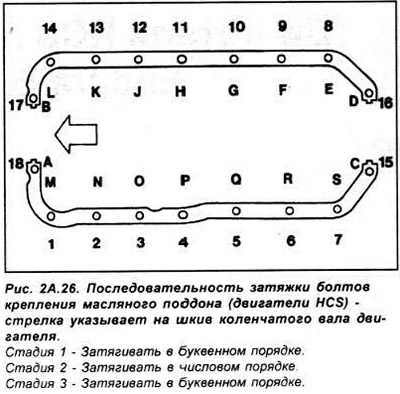
Install the pan and secure with bolts in the specified sequence. Finally tighten the bolts after the engine has warmed up (see Fig. 2A.26).
Install the plate to the front of the clutch housing. Install the starter.
Bolt the exhaust outlet pipe to the manifold.
Check that the oil drain plug is in place and securely tightened, then lower the vehicle.
Fill the engine with motor oil.
Connect the ground wire to the battery and start and warm up the engine.
After 15 minutes of operation, turn off the engine and tighten the oil pan mounting bolts (stage 3).
Installation. Endura-E engines
Completely clean the mating surfaces of the oil pan and cylinder block.
Apply sealant to the front and rear of the cylinder block where the gasket will be installed. Also apply sealant to the corners of the semi-circular areas on the chain cover and the rear fastener of the oil seal ring.
Place the gasket on the oil pan and install the pan onto the cylinder block.
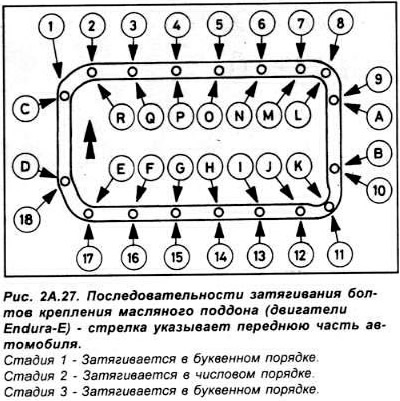
Tighten the bolts in a specific sequence. Final tightening of the bolts should be done after the engine has warmed up (see Fig. 2A.27).
Screw in the bolts securing the sump ledge to the gearbox. Install the starter.
Install the air conditioning compressor, then the accessory drive belt.
Bolt the exhaust outlet pipe to the manifold.
Check that the oil drain plug is in place and securely tightened, then lower the vehicle.
Fill the engine with motor oil.
Connect the ground wire to the battery and start and warm up the engine.
After 15 minutes of operation, turn off the engine and tighten the oil pan mounting bolts (stage 3).