Contents: 3.0L - Front Head ↳ 3.0L - rear head ↳ 3.8L - Front Head ↳ 3.8L - rear head ↳ For all engines ↳
1. Drain the cooling system (chapter 1).
2. Disconnect the negative battery cable.
3. Remove the air cleaner assembly.
4. Remove the drive belts (chapter 1).
3.0L - Front Head
5. Remove the main drive belt assembly with tensioner (chapter 1).
6. If available, remove the power steering pump mounting nuts without disconnecting the hoses.
7. Remove the coil bracket (chapter 5) and the ground wire.
3.0L - rear head
8. Remove the engine support bracket (generator adjustment bracket).
9. Remove the ground wire from the engine lifting eye. Remove the bolts from the throttle cable support bracket at the opposite end of the head.
3.8L - Front Head
10. Remove the generator and bracket (chapter 5).
11. Remove the power steering pump (if equipped) without disconnecting the hoses.
12. If there is an air conditioning system, separate the system compressor from the mounting bracket without disconnecting the hoses. Set it aside.
Warning: Do not disconnect the air conditioning system hoses without a specialist.
3.8L - rear head
13. Disconnect the air intake system bracket from the rear of the cylinder head.
14. Remove the drive belt assembly with tensioner.
15. Remove the exhaust manifold air inlet pump (chapter 6).
For all engines
16. Remove the intake manifold (section 6).
17. Remove the exhaust manifold (section 7).
18 Remove the valve cover(s) (section 3).
19. Loosen the pivot bolts enough to remove the valve levers from the push rods and turn them to the side.
20. Remove the push rods (section 4).
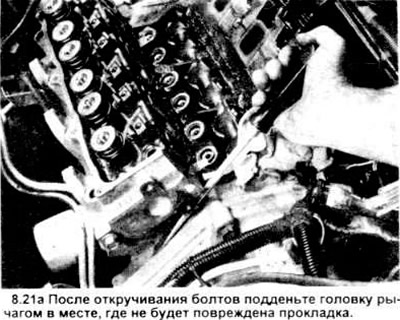
21. Remove the head bolts and lift the cylinder head (see illustration). When removing the front head from a 3.0L engine, lift it over the centering pins and pull it toward the transmission to remove the power steering pump mounting studs from the bracket (see illustration). Set the pump aside so that fluid does not leak out.

22. Carefully remove all gasket residues with a scraper and clean the parts with solvent. Clean traces of oil with a rag soaked in acetone or varnish solvent. In chapter 2 parts C describes procedures for checking cylinder heads.
23. To rethread the head bolt holes, use a tap of the appropriate size. On 3.0L engines, use a die to rethread the head bolts. 3.8L models require new bolts. Lubricate the bolt threads with oil, except as noted below.
24. Recheck the cylinder head and block bolt holes and cylinder bores for coolant, oil, and other contaminants. Remove the unit if necessary.
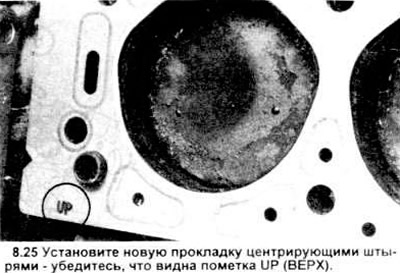
25. Install the new gasket onto the block guide pins. The top of the gasket should be stamped with TOP or THIS SIDE UP to install it correctly (see picture). Do not use sealant when installing the gasket.
Note: On 3.8L and 3.0L engines from 1992 onwards, the bolts must be replaced each time the head is installed. Apply a thin coat of sealant (such as Ford D8A2 - 19554 - A or similar) to the threads of the short cylinder head bolts (closest to the exhaust manifold).
26. Tighten the head bolts by hand.
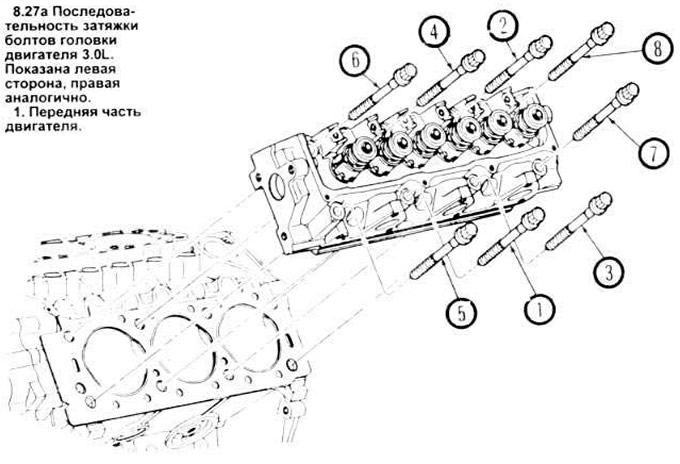
27. According to the specified sequence (see figure), tighten the head bolts in several stages to the required tightening torque.
28. For 3.8L engines only - loosen the head bolts 2-3 turns and retighten them in the same sequence to the same torque value.
Note: with the same tightening option, there is no need to re-tighten these bolts after working on the engine. However, if desired, you can always check the tightening torque values.
29. Assemble the removed parts in the reverse order of disassembly. Lubricate the valve parts with high viscosity engine oil.
30. Install the pushrods each in its place. At the same time, turn the crankshaft for each valve until the pushrod reaches the lowest point. Install the valve levers, pivot pins and bolts. Tighten to the required torque. Then repeat with the remaining valves.
31. Fill the cooling system, change the oil and filter (chapter 1). Start the engine Check the ignition timing and any leaks.
32. If anything has been replaced or the valves have been ground in, then check the valve clearances as stated in section 4.