Note: Broken valve springs and defective rod seals can be replaced without removing the cylinder head. This operation requires two special tools and a source of compressed air.
1. As recommended section 3 remove the timing cover from the desired cylinder head. If you are replacing all valve stem seals, remove both timing covers.
2. Remove the spark plug from the defective cylinder. If all valve stem seals are changed, all spark plugs must be removed.
3. Turn the crankshaft until. until the piston in the cylinder is at TDC on the compression stroke (see instructions in section 11). If you are changing seals on all valve stems, start with cylinder #1 and work on cylinder valves one at a time Go from cylinder to cylinder in firing order (1 - 4 - 2 - 5 - 3 - 6).
4. Screw the adapter into the spark plug hole and connect an air hose from a compressed air source to it.
5. Remove the bolt, pivot pin, and lever from the defective valve and pull out the stem. If the seals of all valve stems are replaced, then all levers and rods must also be removed (see section 4).
6 Supply compressed air to the cylinder. Valves must be held in place by air pressure. If the valve surfaces or seats are in poor condition, leaks can prevent the valves from being held in pressure, in which case use the recommendations below.
7. If you do not have access to compressed air, use an alternative method. Set the piston to just before TDC on the compression stroke, then thread the long end of the nylon string through the spark plug hole so that it fills the entire combustion chamber. Make sure the other end of the rope hangs freely outward so that it can be easily pulled out. Use a long socket wrench to rotate the crankshaft in the direction of its normal motion until a slight resistance is felt.
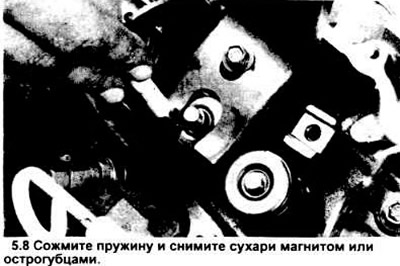
8. Plug the holes in the cylinder heads above and below the valves with a clean rag so that parts and tools do not get into the engine, then compress the spring with a valve spring compressor. Remove crackers with small needle nose pliers or a magnet (see picture).
Note: There are a couple of different types of tools available to compress the valve springs with the head not removed. One of them grabs the lower rings of the spring and presses on the latch when the handle is turned; the other one. shown in this book uses a valve lever bolt as the lever arm. Both types have performed well.
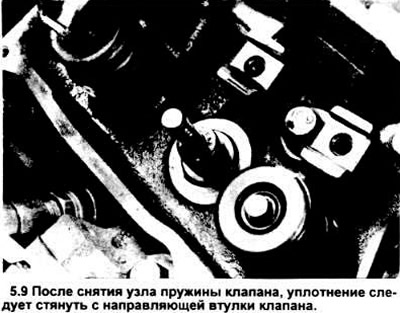
9. Remove the spring retainer shield and valve spring assembly, then remove the valve bayonet umbrella seal in the guides (see picture).
Note: If the valve is not held closed by air pressure, the valve face or seat is damaged. In this case, the cylinder head must be removed for further repair.
10. Tie the top of the valve stem with a rubber band or ribbon to prevent the valve from falling into the combustion chamber, then turn off the air.
Note: If string is used instead of pressurized air, rotate the crankshaft slightly in the opposite direction of its normal rotation.
11. Check the valve stem for damage. Rotate the valve in the guides; if its end moves along an eccentric path (deviates from the axis of rotation), which means it's bent.
12. Move the valve up and down the guides and make sure it does not stick. If the valve stem sticks, either the valve is bent or the guides are damaged. In any case, the head must be removed and repaired.
13. Apply compressed air to the cylinder to keep the valve in the closed position, then remove the rubber band or webbing from the stem. If a rope was used instead of compressed air, turn the crankshaft in the direction of its normal rotation until a slight resistance is felt.
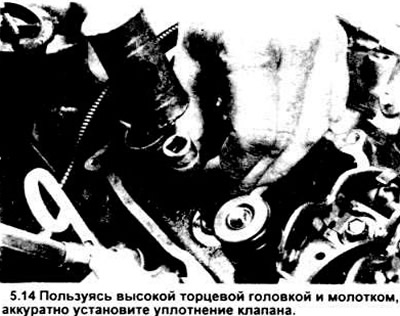
14. Lubricate the valve stem with engine oil and install a new guide umbrella seal (see picture). On 3.0L engines, the intake seals have a silver rim and the exhaust seals are red.
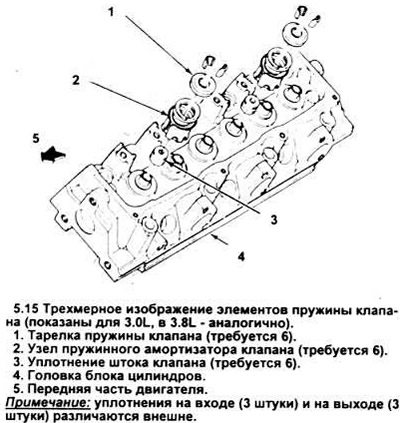
15. Install the spring assembly and spring seat (din where necessary) in position above the valve (see picture).
16. Install the valve spring cap. Compress the valve spring kit.
17. Install crackers in the grooves. You can apply a small amount of lubricant to hold the holders in place. Relieve pressure and make sure the holders are in place.
18. Disconnect the air supply hose and remove the adapter from the spark plug hole. If rope was used instead of air, remove it from the cylinder.
19. Install the valve levers and push rods as recommended in section 4.
20. Install the spark plugs and connect the wires to them
21. Install the timing cover as recommended Section 3.
22. Start and warm up the engine, then check for oil leaks and listen for any unusual sounds from the timing cover area.
Visitor comments