Withdrawal
Remove the negative terminal from the battery.
Remove the air filter housing.
Remove the rubber seal from the top of the engine compartment bulkhead.
Release the wiring harness from the fasteners on the bulkhead of the engine compartment.
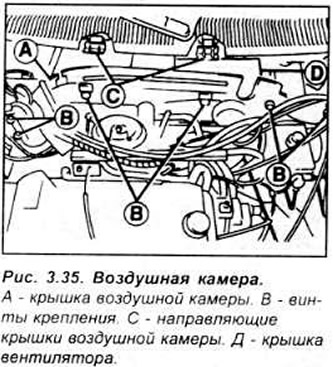
Unscrew 6 screws and remove the upper part of the air chamber (see fig. 3.35).
Remove the fan cover from the guides and remove it.
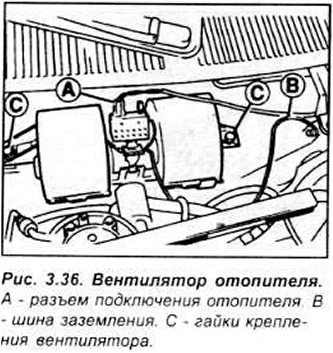
Disconnect the connector from the fan, then unscrew the two nuts and remove the fan from the airbox (see fig. 3.36).
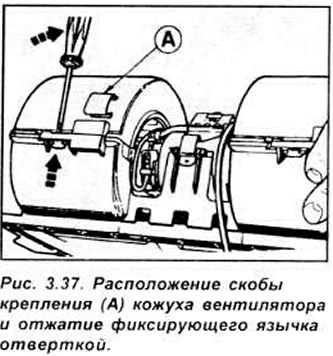
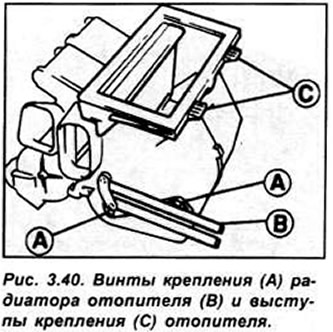
Remove the engine from the casing, for which remove 4 mounting brackets and wring out the fixing tabs with a screwdriver. Disconnect the wire connector from the resistors. Bend the mounting bracket and disconnect the resistor from the fan motor Remove the fan motor from the shroud (see fig. 3.37).
Installation
Installation is made in sequence, return to removal.
Heater radiator
Withdrawal
Remove the negative terminal from the battery.
Drain the coolant from the cooling system.
Disconnect the coolant supply hoses to the heater from the bulkhead of the engine compartment (see fig. 3.38).

Unscrew the two screws and remove the plate with the gasket securing the heater hoses to the bulkhead of the engine compartment.
Unscrew two screws and remove the top casing of a steering column.
Unscrew 4 screws and remove the lower casing of a steering column.
Remove the steering wheel.
Remove the mounting screw and remove the multifunction switch from the steering column. Disconnect the switch connector.
On models prior to 1996, remove the heater control knobs. Loosen the two upper mounting screws on the back of the dashboard holder and remove the holder, releasing it from the mounting brackets on each side. Remove the radio. Unscrew the two screws securing the radio container and remove the radio container.
Remove the front door seals from the front. Unscrew the screws and remove the trim of the front pillars of the front doors. Unscrew screws of fastening of the panel of devices. Remove the center console. Remove the decorative panel of the heater by pulling it towards you from the left and right sides. Disconnect the heater control cable from its housing. To do this, remove the cover of the mounting brackets on the drive lever on the right side. Remove the cable anchor. Disconnect the heater control drive from the mounting bracket. Remove the cable from the left side of the heater in the same way.
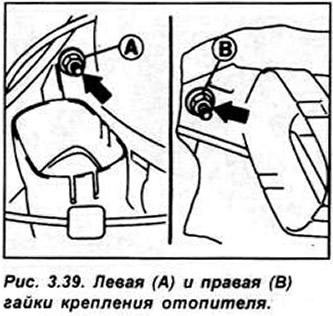
Remove the rear fog light and rear window defroster switches by inserting a narrow screwdriver between the switch and the instrument panel. At the same time, place a rag or paper so as not to damage the surface of the panel. Carefully remove the switch. In this case, alternately install the screwdriver from above and below. Unscrew the bolts and remove the heater control panel. If available, unscrew the two bolts from the heater support struts. Remove the central air duct from the heater by pulling it towards you. Disconnect the side air ducts from the heater body. Unscrew the two nuts and remove the heater by sliding it down and to the side (see fig. 3.39).
Installation
Installation is done in sequence. reverse withdrawal
Left ventilation nozzle
Withdrawal (models until 1996)
Remove the negative terminal from the battery. Unscrew two screws and remove a decorative overlay of a combination of devices.
Unscrew the two screws and remove the nozzle from the panel.
Withdrawal (models since 1996)
Remove the negative terminal from the battery.
Unscrew two screws and remove the top casing of a steering column. Unscrew 4 screws and remove the lower casing of a steering column. Remove the steering wheel Using the lever, remove the 3 heater control knobs.
Remove the top two screws from the back of the dashboard holder. Remove the holder from the brackets (2 at the top, 4 at the bottom and 1 near the steering wheel). Remove the holder and disconnect the multi-pin electrical wiring connectors.
Remove the mounting brackets and remove the ventilation nozzle from the panel.
Installation
Installation is made in sequence, return to removal.
Right Ventilation Nozzle
Withdrawal
Remove the negative terminal from the battery.
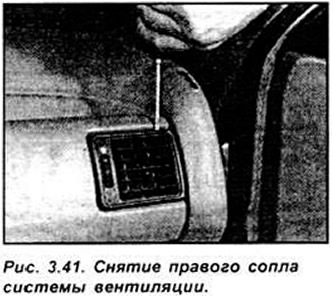
Open the glove box lid Unscrew the mounting bolt and. being careful, wring out the ventilation nozzles with a screwdriver from the panel (see fig. 3.41).
Installation
Installation is made in sequence, return to removal.
Central nozzles of the ventilation system
Withdrawal (models until 1996)
Remove the negative terminal from the battery.
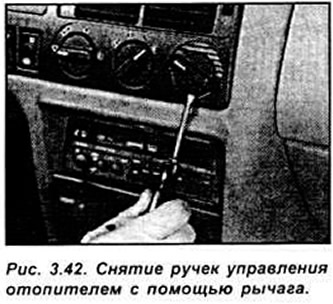
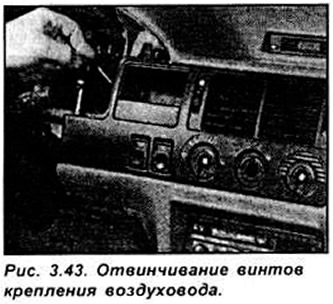
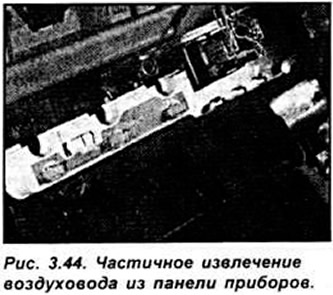
Unscrew 2 screws and remove a decorative overlay of a combination of devices. Remove 3 heater control knobs. Unscrew the fixing screws of the central part of the air duct and partially remove the air duct in order to be able to disconnect the electrical connectors from the inside of the air duct (see fig. 3.42-3.44).
Remove the electrical connectors from the rear window defroster and rear fog light switches, then remove the center air duct from the panel.
Withdrawal (models since 1996)
Remove the negative terminal from the battery.
Unscrew 2 screws of fastening and remove the top casing of a steering column. Unscrew 4 screws and remove the lower casing of a steering column. Remove the steering wheel. Using a lever, remove the 3 heater control knobs. Unscrew the 2 upper screws securing the back side of the dashboard holder and remove the holder. Disconnect the electrical connectors from the holder.
Remove the mounting brackets and remove the ventilation nozzles from the panel.
Installation
Installation is made in sequence, return to removal.
Visitor comments