Contents: Removal and installation ↳ Examination ↳
Lambda probe
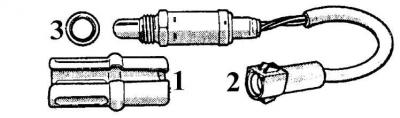
1 – heat shield; 2 – connector; 3 – sealing ring
The lambda probe or oxygen sensor measures the amount of oxygen in the exhaust gases and transmits information to the electronic unit, which changes the composition of the fuel-air mixture to ensure combustion of the exhaust gases in the catalytic converter.
Removal and installation
1. Remove the ground cable from the battery and raise the rear of the vehicle.
2. Remove the multi-pin connector and heat shield from the lambda probe.
3. Unscrew the lambda probe from the muffler and remove it together with the gasket.
4. Install the lambda probe in the reverse order of removal.
Examination
The lambda probe is checked on a warm engine.
1. Connect the LED tester and voltmeter to the diagnostic connector located on the left side of the engine compartment in the wiring harness above the pillar.
2. When the lambda probe is working properly, the voltage should be 4.5 volts. If the voltage is different, the CO content must be adjusted.
3. If there is no voltage, the lambda probe is not working properly.
[This article was borrowed from the website: www.FordBook.ru]