Note: Ford recommends that whenever a belt is removed, it should be replaced with a new one, even if it was removed only for access purposes. Tensioning a previously used belt will cause it to fail quickly, which can cause serious engine damage.
General part
1. The timing belt drives the camshaft and fuel pump from a timing pulley located at the front of the crankshaft. If the belt slips or breaks during operation, the pistons will collide with the valve heads, causing serious engine damage.
2. The timing belt should be replaced with a new one at regular intervals or sooner if it is contaminated with oil or makes noise during operation (due to uneven wear).
3. If the timing belt needs to be replaced, it is advisable to check the condition of the water pump at the same time (for signs of coolant leakage). This will help avoid having to remove the timing belt again later when the water pump fails.
Removal
4. Disconnect the negative battery cable.
5. Remove the camshaft timing belt cover as described in Section 6.
6. Set piston No. 1 to TDC, then secure the crankshaft, camshaft and fuel pump toothed pulleys in the position described in section 4.
7. Loosen the timing belt tensioner roller and the bolts securing the sliding lever, then press the tensioner (using a lever if necessary), to loosen the belt tension (see Fig. 7.7). While holding the tensioner in this position, tighten the locking bolts.
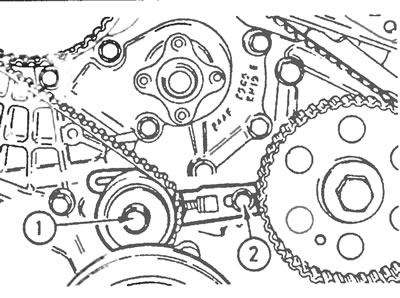
Figure 7.7. Fixing bolts of the tension roller (1) and sliding lever (2) of the toothed belt of the camshaft drive.
8. Remove the timing belt and discard it (see Figure 7.8).
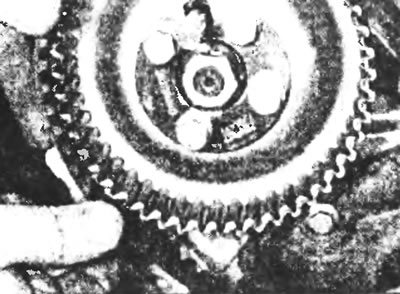
Figure 7.8. Removing the camshaft drive toothed belt from the toothed pulley.
Inspection
9. If a new timing belt is being installed, ensure that the belt is selected correctly for the year of vehicle production. Models produced before 1992 used timing belts with a tooth height of 2.5 mm. Models produced after 1992 had their tooth height increased to 3.5 mm (see Fig. 7.9).
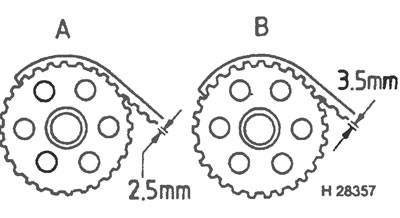
Figure 7.9. Timing belt tooth: A - produced before 1992, B - produced since 1992.
Installation
Caution! Do not crank the engine with the camshaft drive belt removed to avoid damaging the pistons and valves.
Ford recommends not to tighten a new belt if the engine is warm; it is necessary to allow the engine to cool for at least three hours.
11. It is necessary to make sure that piston No. 1 is still in the TDC position and the three installation pins are still installed.
12. Loosen the four fuel pump sprocket retaining bolts and rotate the sprocket until the bolts are centered in their elongated slots.
13. Place the timing belt on the crankshaft timing pulley, making sure that the direction of rotation arrow points in the correct direction.
14. After securing the timing belt to the crankshaft timing pulley, guide it over the camshaft timing pulley and the fuel pump timing pulley, pulling it tight (see Figure 7.14). If necessary. rotate the fuel pump sprocket within the bolt holes to facilitate installation.
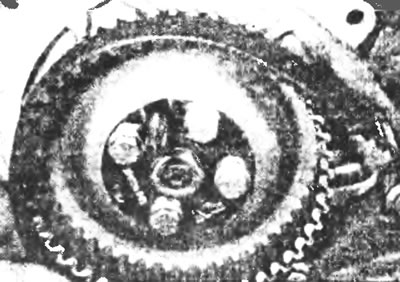
Figure 7.14. Position the camshaft timing belt over the timing pulleys, pulling it tight.
15. Pull the belt down and around the tensioner, then loosen the tensioner locking bolts to pull it back. Tighten the bolts securely.
16. Tighten the fuel pump sprocket retaining bolts to specification.
17. Pull out the three locating pins and turn the crankshaft 1 and 7/8 turns clockwise.
18. Loosen the two timing belt tensioner fixing bolts a little more, then press firmly on the timing belt at the center of its longest branch to engage the tensioner. Tighten the tensioner bolts to the specified torque.
19. Turn the crankshaft 1/8 turn clockwise to allow the crankshaft dowel pin to be inserted.
20. Check whether the fuel pump installation pin can be inserted, if not, loosen the fuel pump toothed pulley fixing bolts and slightly turn the bolts one way and the other until the pin goes in. Then tighten the bolts to the required torque.
21. Pull out all three dowel pins and install the plastic plug into the crankshaft dowel pin hole. On engines with a crankshaft position sensor, install the sensor with an adjusting shim.
22. Install the camshaft timing belt cover as described in section 6, then connect the battery.