Please note: The procedure below only applies to vehicles with standard brake systems. Do not rebuild the master cylinder on vehicles equipped with an ABS system. Before beginning work, refer to the brake fluid hazard warning at the beginning of this manual Section 2.
1. Remove the master cylinder (see previous section).
2. Remove the brake fluid reservoir filler cap and the low brake fluid indicator cap along with the indicator. Turn the cylinder over and release the remaining liquid from the tank.
3. Separate the reservoir from the master cylinder by unscrewing the two retaining screws. On some models, to remove the tank, simply pull it up and remove the rubber seals (see Figure 11.3.).
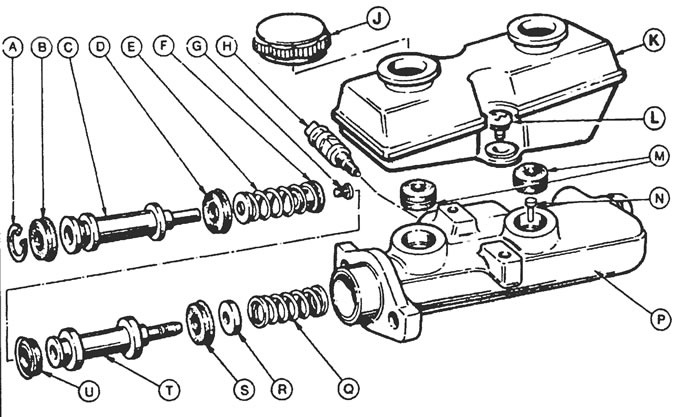
Figure 11.3. Master cylinder: A - Retaining ring, B - Sleeve, C - First piston, D - Sleeve, E - Spring, F - Lock, G - Screw, H - Brake fluid level indicator lamp switch (if provided), J - Reservoir Cap, K - Master Cylinder Reservoir, L - Screw, M - Seals, N - Lock Pin, P - Cylinder, G - Spring, R - Lock, S - Seal, T - Second Piston, U - Seal
4. Secure the cylinder in a vice with soft jaws, then use a pin fragment to push down on the primary piston. While holding the piston at the desired level, remove the locking pin from the front inlet of the reservoir (see Figure 11.4.).
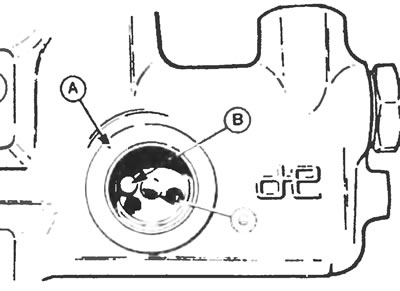
Figure 11.4. Master cylinder (1), locking pin (2) and inlet port (3) of the second piston.
5. After removing the retaining ring from the cylinder neck, remove the internal components. Place them on a clean surface in the exact order of removal - tap the cylinder after placing it on a block if necessary to remove the secondary piston.
6. Carefully separate the spring, bushing and seals from the secondary piston.
7. Wash all components with clean brake fluid or methyl alcohol. Inspect the pistons and the inside of the cylinder liners for nicks, scratches, or shiny areas due to wear; if any of these symptoms are present, replace the master cylinder as a whole with a new one. If the cylinder surfaces are in good condition, order a rebuild kit consisting of a primary piston and new secondary piston seals.
8. Soak new seals in clean brake fluid and install them on the second piston. When installing, use only your hands (without any tools) and make sure the seals are positioned correctly (see figure 11.8,a,6). Install the spring and bushing on the second piston.
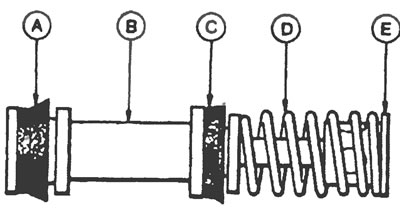
Figure 11.8,a. Details of the first piston: A - Seal, B - Piston, C - Seal, D - Spring, E - Retainer.
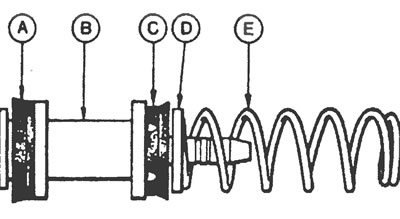
Figure 11.8,b. Details of the second piston: A - Seal, B - Piston, C - Seal, D - Retainer, E - Spring.
9. After generously lubricating the pistons with clean brake fluid, install them into the master cylinder sleeve - first the second piston, and then the first.
10. Install the retaining ring onto the cylinder neck, then press in the first piston and install the second piston retaining pin.
11. Lubricate the brake fluid reservoir seals with clean brake fluid, then install the reservoir (and secure it with two screws if necessary).
12. Install the brake fluid reservoir filler cap and low brake fluid indicator.
13. Install the master cylinder as described in previous Section.