1. Contact Section 9 and remove both axle shafts.
2. Place a drain pan under the differential housing to drain the oil.
3. After marking the relative positions of the pinion flanges and the drive shaft so that they can be reinstalled in their original positions later, unscrew the four bolts, disconnect the shaft and support it with supports. Please note that new bolts will be required for installation.
4. Unscrew the eight self-locking nuts securing the differential housing to the rear axle housing, then move it slightly to allow the oil to drain into a container.
5. Using a jack (or with the help of an assistant), remove the differential housing from the studs by pulling it out from under the car (see Figure 13.5).
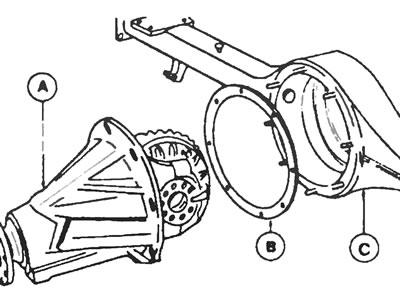
Figure 13.5. Removing the differential housing of the "H" type axle: A - Differential and housing, B - Flange gasket, C - Rear axle housing.
6. Remove the gasket from the drive axle housing studs; a new gasket will be required during assembly.
7. Further disassembly of the differential is not recommended. If it is in poor condition, have it disassembled by a dealer who has the necessary tools. If this is not possible, replace the differential with a new one.
8. Installation of the differential housing is carried out in the reverse order of removal, but note the following points:
- a) Check the mating surfaces of the differential housing and axle for any burrs that need to be filed down; always use a new gasket when installing;
- b) Make sure the differential housing is installed with the pinion facing down. Tighten the lock nuts in a diagonal sequence in three or four stages;
- c) The flanges of the drive gear and the cardan shaft should be aligned according to the previously made marks, and then secured with new mounting bolts;
- d) Tighten all nuts and bolts to the specified torque;
- d) Turning to Chapter 1, If necessary, fill the rear axle with the recommended grade of oil until the level reaches the bottom edge of the filler plug hole, then install and tighten the plug;
- e) if a new differential is installed, it must be run in (500 miles or 800 km), to allow the new bearings to run in.
For more information, please visit the specified website (fordbook)