Withdrawal
1. Loosen the clamp of the air cleaner connecting sleeve and disconnect the tube (see picture).
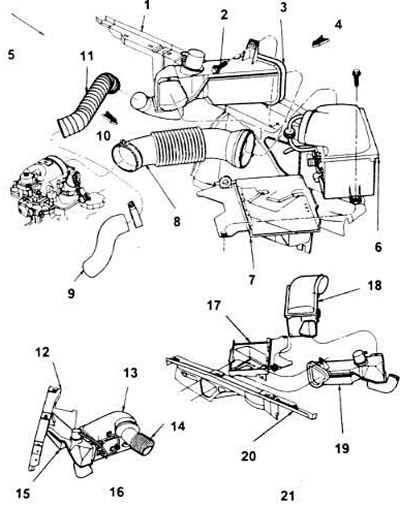
8.1, a. 3D view of the air cleaner housing assembly of a typical four-cylinder engine.
1. Wing apron.
2. Screw.
3. Air intake and pipeline assembly.
4. View 2.
5. The front of the car.
6. Air cleaner assembly.
7. Battery shelf.
8. Connecting sleeve.
9. Heat shield.
10. View.
11. Hot air hose.
12. Wing apron.
13. Air cleaner kit.
14. Outlet tube assembly.
15. Air intake and pipeline.
16. View Y.
17. Battery shelf.
18. Air cleaner assembly.
19. Air intake assembly.
20. Wing apron.
21. View Z.
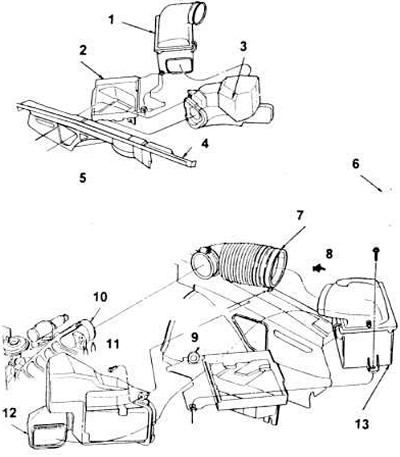
8.1, b. 3D view of a typical air cleaner kit on a 3.0LV6 engine.
1. Air cleaner kit.
2. Battery shelf.
3. Air intake and pipeline.
4. Wing apron.
5. View Z.
6. Front of the car
7. Connecting sleeve.
8. View Z.
9. Sealing ring of the battery shelf.
10. Collector assembly.
11. Screw.
12. Air intake and pipeline.
13. Air cleaner assembly.
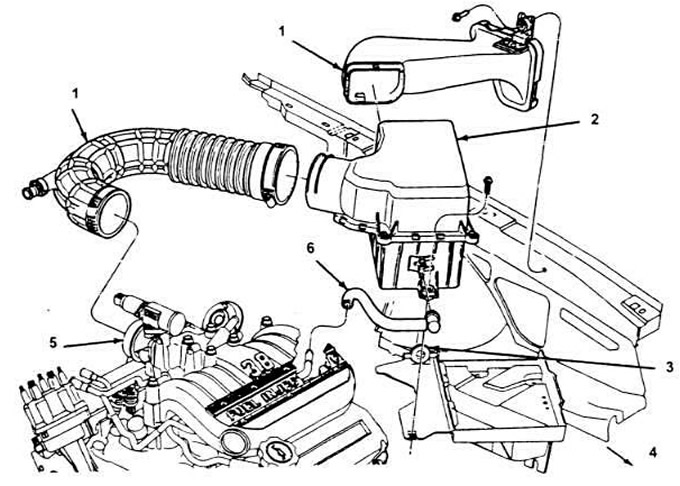
8.1, c. 3D view of a typical air cleaner kit on a 3.8LV6 engine.
1. Air intake.
2. Assembly of the air cleaner.
3. Sealing ring of the battery shelf.
4. The front of the car.
5. Intake manifold inlet.
6. Assembly of the PCV valve.
7. Connecting sleeve.
2. Disconnect the ventilation hoses from the air cleaner cover.
3. Separate the hot air tube (only for four-cylinder engines) and the PCV inlet tube.
4. On temperature sensor (only for four-cylinder engines up to 1990) Disconnect the cold weather modulator vacuum hose. Also pull out all the electrical connectors that come across during the disassembly process
5. Remove the air cleaner, mounting clips or screws, and the entire air cleaner assembly.
6. Inspect the inner surfaces of the cover carefully - there may be dirt leaks behind the filter. If there are, check the integrity of the filter gaskets, and also make sure that the correct size of the filter itself is installed and that the clamps are not loose and securely hold the cover.
7. Remove the air cleaner element and clean the sealing surfaces on the cover and in the chute.
8. Put in a new element (see chapter 1), but only after a thorough check of it - warping of the seals, holes in the cardboard that appeared during operation are possible.
Installation
9. Place the air cleaner kit on the battery shelf. Make sure the mounting seal ring is metal-side up and the battery seal is fully seated in the shelf. Check the air cleaner hinged cover. Tighten the mounting clips.
Note: The air cleaner mounting tab is installed with the battery trough sealing gasket.
10. Through the rubber seal (should be with the metal surface up) thread the screws and insert them into the J-clamp of the battery tray.
11. On a four-cylinder engine, connect the cold weather modulator vacuum hose from the temperature sensor.
12. Connect the hot air tube (for four-cylinder engines only, PCV intake pipe, air pulsator pipe and whistle pipe
13. Install the connecting sleeve from the air cleaner Securely fasten the clamps.
14. Connect vent hoses and air cleaner covers
15. Start the engine and check for possible leaks at both ends of the hose from the air cleaner to the throttle body.
Visitor comments