Warning: Gasoline is extremely flammable, so precautions should be taken when working on any part of the fuel system. Do not smoke, allow open flames or uninsulated lights in the work area.
1. Relieve the fuel system pressure (see section 2).
2. Remove the gas tank (see section 5).
3. Clean away any dirt that has collected around the fuel pump flange to prevent it from falling into the tank when removing the fuel pump/sensor assembly.
4. Using a bronze spacer, tap the lock ring counterclockwise until it comes loose. Carefully remove the pump/sensor assembly from the tank (see illustration).
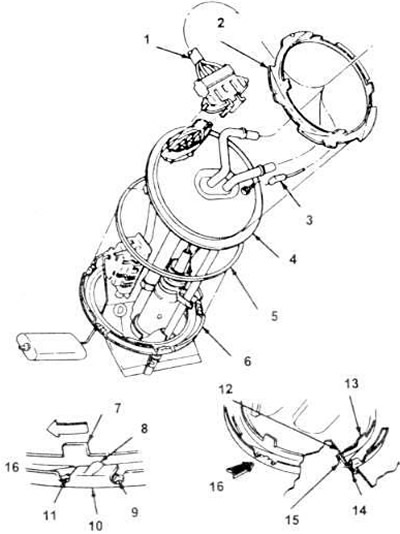
7.4 3D image of the sensor/fuel pump assembly in the kit.
1. Electrical connector.
2. Lock ring.
3. Electrical wiring kit.
4. Sensor and fuel pump assembly.
5. O-ring.
6. Retaining ring.
7. Closing ledge.
8. Tongue.
9. Stopper.
10. Retaining ring.
11. Latch.
12. Fuel pump sensor kit.
13. Lock ring 9C385.
14. Retaining ring.
15. O-ring.
16. View A.
5. Remove the old lock ring seal and discard it.
6. If you are thinking of reinstalling a previously used pump/sensor unit, you will need to remove the filter, wash it with solvent, and then reinstall it on the metal tube at the end of the pump. If you are installing a new unit, the assembly will also include a new filter.
7. Clean the working surface of the fuel pump flange, the surface of the fuel tank and the groove for the sealing ring.
8. Reassemble in reverse order. To hold the new lock ring gasket in place during assembly, lubricate it with some consistent grease.
The article was taken in its entirety from the specified website: FORDBOOK.RU