Lubricate the crankshaft journals and secure the toothed and V-wheels to it using the central bolt (see 2.37).

Install the water pump with a new gasket.
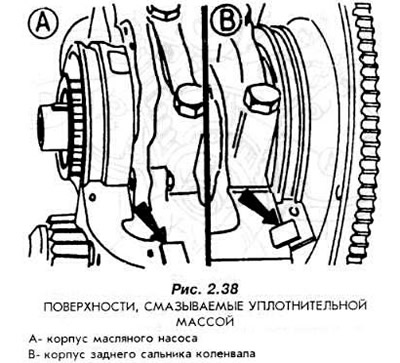
Lubricate the sealing compound on the oil pan flange seating surface within the shockproof casing (Fig. 2.38).
Place a new rubber gasket in the groove of the seal housing and fit the oil pump housing. To facilitate installation, screw ten M6 studs into the threaded holes.
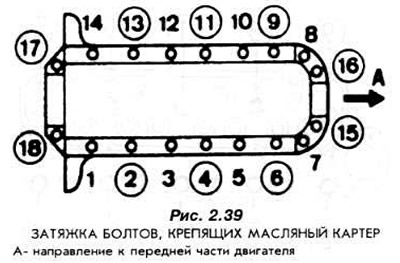
Install the oil pan and tighten the mounting bolts firmly.
Make sure that the pins that center the oil pan fit into the corresponding holes in the gasket.
Tighten the bolts in the required sequence (Fig. 2.39) until the tightening torque specified in Section 1.1 is reached.
Install the bushings in the engine housing to center the cylinder head gasket.
Degrease the cylinder head seating surface and the upper surface of the engine housing. Use gasoline for this purpose.
Install a new cylinder head gasket (Fig. 2.40).
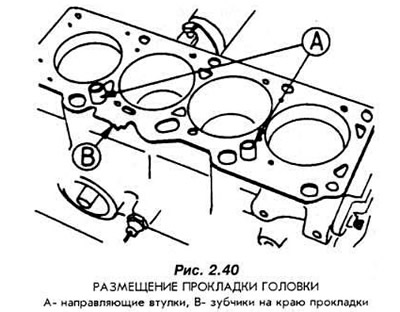
Cylinder head gaskets have the following designations:
- two teeth (B, Fig. 2.40) on the edge indicate the gasket for the 1.4i engine.
- four teeth indicate the gasket for the 1.6i engine.
Before installing the cylinder head, set the piston of the first cylinder to TDC. Set the camshaft in such a position that the valves in the fourth cylinder are in the divergence position (ignition in the first cylinder).
Install the cylinder head with the degreased seating surface to the gasket.
Screw in new cylinder head bolts and tighten them according to Fig. 2.41 in four stages.
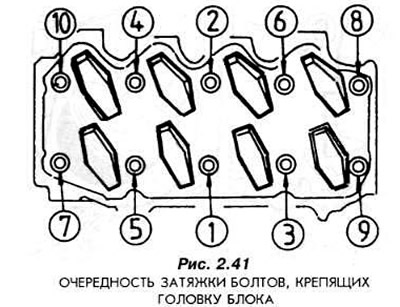
The following bolt tightening torques should be adhered to:
- Stage I: 20-40 Nm
- Stage II: 40-60 Nm
- Step III: Rotate 90°
- Stage IV: Rotate another 90°
Tightening the cylinder head bolts after the engine has been running for some time is not required.
Loosen the timing belt tensioner and move it as far to the left as possible.
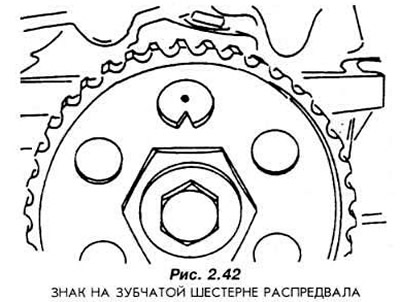
Install the camshaft according to Fig. 2.42.
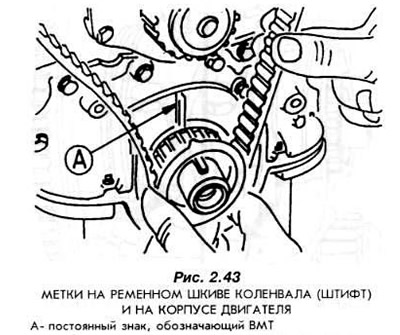
Turn the crankshaft so that the marks match, as shown in Fig. 2.43.
Install the timing belt so that its left side is taut.
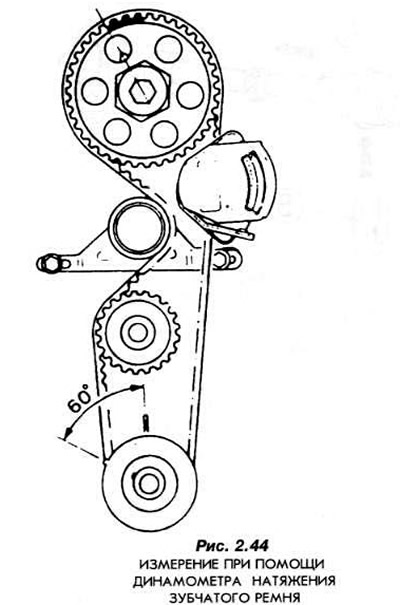
Tighten the toothed belt. To do this, do the following:
- move the tensioner and tighten the belt.
- tighten the tensioner mounting bolts.
- turn the crankshaft two revolutions clockwise (looking at the shaft from the front). Make sure that there is no noticeable resistance during rotation.
- turn the crankshaft and set the piston of the first cylinder to TDC.
- turn the crankshaft 60°.
- install dynamometer 21-113 (Fig. 2.44) and determine the value of the toothed belt tension.
- the tension of a new belt should be 10-11 divisions on the dynamometer scale, and the tension of a used belt should be within 4-6 divisions.
- adjust the belt tension using the tensioner until you get the correct tension (after each adjustment, measure the tension, maintaining the recommended sequence of actions).
Install both parts of the belt cover.
Install the V-belt pulley onto the crankshaft journal.
Screw in new spark plugs.
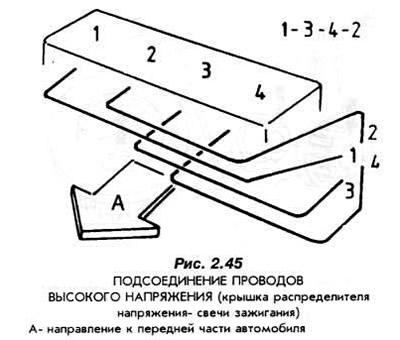
Install the distributor housing with high-tension wires (Fig. 2.45).
Install the oil filter. To do this, lubricate the gasket and screw the filter on by hand so that the gasket fits well. Then turn the filter housing another 3/4 turn.
Screw in the oil drain plug with a new gasket.
Fill the engine with oil and install the dipstick.
Install the generator and put on the V-belt of its drive.
Tighten the V-belt so that it deflects 8-10 mm when pressed with your thumb.
[The original version can be found on the website: FordBook]