Secure the engine to the mounting stand.
Remove the generator.
Remove the starter with the bracket.
Unscrew the engine mount bracket.
Drain the oil and unscrew the oil filter.
Unscrew the clutch cover from the flywheel.
Unscrew the bolts securing the flywheel. Remove the flywheel.
Remove the bolts securing the upper and lower casings of the timing belt that drives the camshaft.
Secure the 15-030 A tool (Fig. 2.26).
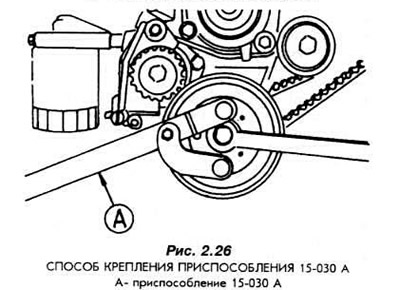
Remove the vibration damper.
Remove the toothed wheel from the camshaft (Fig. 2.27).
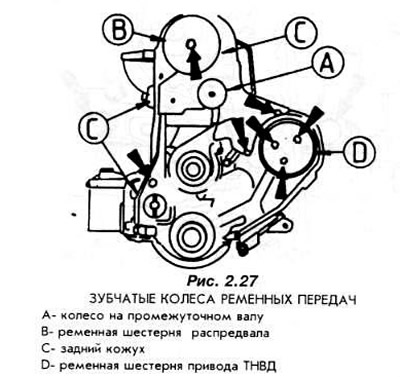
Remove the rear timing belt cover.
Remove the gear from the injection pump shaft.
Remove the fuel pipes from the injection pump.
Unscrew the fuel filter with the bracket from the engine block head.
Remove excess fuel from the injectors by removing the overflow fuel lines.
Remove the high pressure fuel lines.
Unscrew the injectors using the MS 1501 (Churchill) tool.
Disconnect the electrical wires and unscrew the spark plugs.
Remove the fuel injection pump bracket.
Remove the fuel injection pump.
Remove the cylinder head cover.
Remove the tube connecting the water pump to the thermostat housing.
Unscrew the thermostat housing from the engine housing.
Unscrew the cylinder head mounting bolts, starting from the outside and moving towards the middle. This action should be performed in the reverse order than shown in Fig. 2.28.
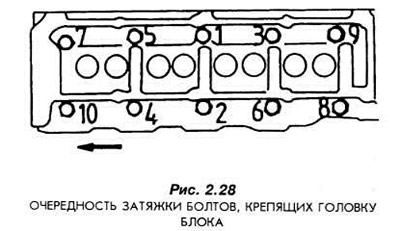
Remove the cylinder head.
Remove the oil filter.
Unscrew the oil pump from the engine body.
Remove the timing belt wheel from the intermediate shaft.
Unscrew the intermediate shaft oil seal housing.
Unscrew the water pump.
Remove the oil pan from the bottom of the engine.
Remove the timing belt gear from the crankshaft (timing belt wheel).
Unscrew the engine end plate.
After unscrewing the bolts, remove the crankshaft rear bearing cover.
Unscrew the oil suction pipe together with the bracket from the engine body.
Unscrew the connecting rod bolts and remove the connecting rod bearing caps.
Remove the pistons with connecting rods upwards.
Assemble the bearing shells with the connecting rods and caps. Connect the connecting rod bolts without tightening them.
Remove the crankshaft main bearing caps.
Remove the crankshaft from the engine housing.
Separate the glued liners and place them in the corresponding holes of the main bearings. Do not mix up the liners under any circumstances!
Place the bearing caps in their appropriate places and secure them with slightly screwed-in bolts. Do not mix up the caps!
Degrease all parts except the liners. Note: In a diesel engine, new bolts must be used for each assembly, securing the connecting rod caps and the crankshaft main bearing caps.
The text was obtained in its entirety from the specified website (FORDBOOK)