Contents: Air conditioning system ↳ For valve systems with a… ↳ For tubular type systems with… ↳ Adding Coolant (for all systems) ↳ Heating system ↳
Air conditioning system
Warning: The air conditioning system is under high pressure. Do not loosen hose fittings or move parts until the pressure has been relieved by an air conditioning technician. Always wear eye protection when disconnecting system lines.
1. To ensure that your air conditioner is operating at peak efficiency, you should perform the following checks regularly.
a) check the condition of the compressor drive belt. Replace it if it is worn or damaged (see chapter 1).
b) check the drive belt tension and adjust if necessary (see chapter 1).
v) check the system pipes. Cracks, bubbles, hardening and deformation of the hoses are possible. Check the hoses and tips for oil bubbles and leaks. If you visually detect wear, damage, or leaks, replace the hoses.
g) check the condenser plates - there may be leaves, insects and other foreign objects that have entered the condenser on their own. Use a "condenser comb" or compressed air to clean it from debris.
d) make sure that the coolant charge in the system is normal.
2. It is a good idea to load the system for 10 minutes at least once a month. This is especially important during the winter months, when prolonged exposure to low temperatures can cause hardening and, as a result, failure of the seals
3. Due to the complexity of the air conditioning system and the equipment required to service it, serious diagnostics and repairs are beyond the scope of this book. However, this chapter provides a number of simple checks and procedures for replacing system components.
4. The most common cause of insufficient cooling is a lack of coolant in the system. If the efficiency of the system has noticeably decreased, one of the following "quick" tests will help you determine the coolant level.
For valve systems with a drying-expansion type receiver
5. Warm up the engine to normal operating temperature.
6. Set the air conditioning temperature selector to the coldest setting and the blower to the top of the scale. Open the car doors (so that the air conditioning system does not turn off immediately after reaching the desired temperature in the cabin).
7. Look through the inspection window (if there is one). If the coolant foams, it means there is not enough of it. Charge the system (see below).
8. If there is no viewing window, feel the inlet and outlet pipes of the compressor. One side should be cold, and the other hot. If there is no significant difference in the temperature of the pipes, then something is wrong with the compressor or the system itself. Including the lack of charge is possible. Further more in-depth testing is beyond the scope of this manual.
For tubular type systems with accumulators/holes
9. Warm up the engine to normal operating temperature.
10. Set the air conditioning temperature selector to maximum "cold" and the blower to the top mark. Open the car doors (so that the air conditioning system does not turn off immediately after reaching the desired temperature in the cabin).
11. After activating the compressor, the clutch will make a characteristic click and its center will begin to rotate. Touch the evaporator inlet pipe between the hole and the battery with one hand and place the other hand on the battery casing (see figure).
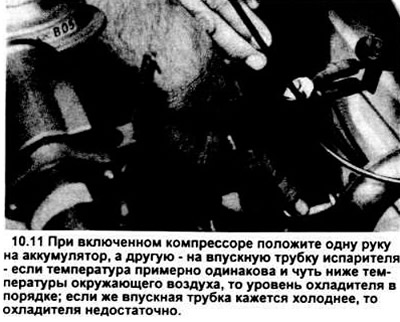
12. If the temperature of both surfaces is approximately the same and slightly lower than the ambient air temperature, then the coolant level is OK. A more detailed study is beyond the scope of this book and should be carried out by specialists.
13. If the intake tube freezes or is colder than the battery surface, the coolant charge is low. Add it as described below.
Adding Coolant (for all systems)
Note: At the time of writing this guide, the procedure described below meets the standards. You will need a cooler in 12 x 14 oz. containers; usually the coolant comes in larger containers (30 lbs.). If you decide to add coolant from larger containers. You will need a set of probes, various tips, adapters and hoses and a Haynes Air Conditioning and Heating Systems Manual.
Warning: Some 1992 models are equipped with systems that use R134 refrigerant. They can be identified by yellow tags on the parts that say "NON CFC". The compressor clutch on R134 systems is gold. Do not confuse these systems or add the wrong refrigerant to them.
14. Purchase a refill kit. The kit includes two or three 14-ounce coolant containers, a threaded valve, and a short piece of hose that attaches to the threaded valve at one end and to the system valve on the bottom of the system at the other end. One of the containers should contain coolant with red dye. If there are leaks in the system, the red dye will help you locate the leak. Do not add more than three containers at a time.
15. Connect the charging kit according to the manufacturer's instructions (see figure).
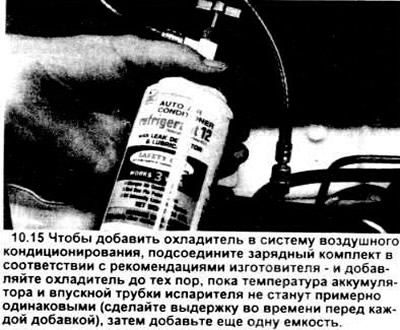
Warning: Do not connect the charging kit to the top of the system under any circumstances.
16. Warm up the engine, turn on the system.
17. If the system is battery type:
a) add coolant from the bottom of the system until the accumulator surface and the evaporator inlet tube are equally hot. Allow the temperature to stabilize before adding more coolant.
b) after the temperatures of the battery surface and the evaporator inlet tube become the same, add the remaining contents of the container.
18. If you have a receiver-dryer type system in your car, place a thermometer in the hole in the dashboard closest to the evaporator and add coolant until the thermometer reads about 5-7 degrees Celsius (40-45 degrees Fahrenheit).
Heating system
19. If the air coming out of the heater vents on the dashboard is not hot enough, this may be due to the following reasons:
a) the thermostat is stuck open.
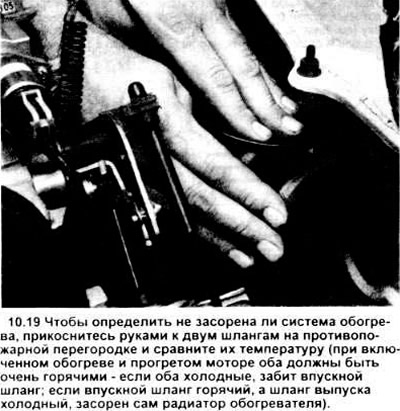
b) the heater hose is blocked, preventing coolant from reaching the heater core. Feel both hoses on the firewall (see picture). They should be hot. If one is cold, there is a problem with either one of the hoses, the heater core itself, or the valve is clogged. Disconnect the hoses and either blow out the radiator with compressed air or flush it with water. If this does not clear the blockage, then remove both hoses and blow them out with compressed air.
v) if the heater still does not supply hot air, the heater core should be replaced (see section 13).
20. If the fan motor speed does not match the speed indicated on the switch, the fuse is damaged, the fan motor resistor is burnt out, or the motor itself is faulty
a) be sure to start checking with the fuse.
b) check the voltage at the fan motor terminals.
v) pull the heating/air conditioning control assembly out far enough to verify with a test light or tester that there is voltage at the control assembly switch (see illustration). If there is no voltage, check the wires from the battery to the switch (see wiring diagrams in the back of the book).

g) the fan motor resistor is located just behind the glove compartment (see section 12). After checking the resistance, make sure that voltage is supplied to it from the switch
- 1. If the resistance is de-energized, check the wires.
- 2. If the wires are normal, replace the switch (see section 11).
d) using a test lamp or tester, determine if the fan motor is receiving pi voltage. If there is no voltage, replace the resistor (see section 12).
21. If air does not come out of the vents, listen; most engines make noise when running.
a) if you can't hear the motor noise (and the switch and resistance are OK), it may be faulty. Replace it (see section 12).
Note: The motor condition can be determined by connecting a wire with a fuse directly from the battery to it.
b) if the sound of the engine running is heard, the vacuum damper may not be working. If air comes out of the pipes when the engine starts (lower vacuum inlet), check the one-way vacuum valve in the engine compartment on the firewall to the right of the two heating hoses).
Also check the vacuum hoses on the back of the HVAC control unit to make sure they are tight. Further testing of the vacuum valve is beyond the scope of this manual.
22. If the mat under the heater radiator is damp or antifreeze vapor or water vapor comes out of the ventilation holes, then the radiator is leaking. Remove it (see section 13) and install a new kit.