Contents: Disassembly ↳ Installation ↳
Note: Before performing this procedure, the air conditioning system (if equipped) must be discharged, consult a specialist.
Disassembly
1. Disconnect the negative battery cable.
2. Drain the coolant from the engine (see chapter 1).
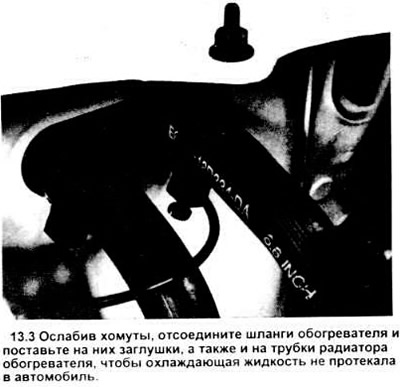
3. Loosen the hose clamps and disconnect the heater hoses from the radiator and the firewall (see illustration). Blow out any remaining coolant from the radiator with a low-pressure air jet.
4. Disconnect the vacuum hose from the internal vacuum control valve.
5. If the vehicle is equipped with an air conditioning system, disconnect the liquid supply line and battery supply line from the evaporator core on the firewall. Cap the supply lines and the evaporator core inlet and outlet to prevent contamination.
6. Remove the instrument panel (see chapter 11).
7. Remove the bracket supporting the evaporator (see figure), located between the instrument panel and the recirculation pipes.
13.7 Before removing the heater/evaporator housing, disconnect it from the bracket.
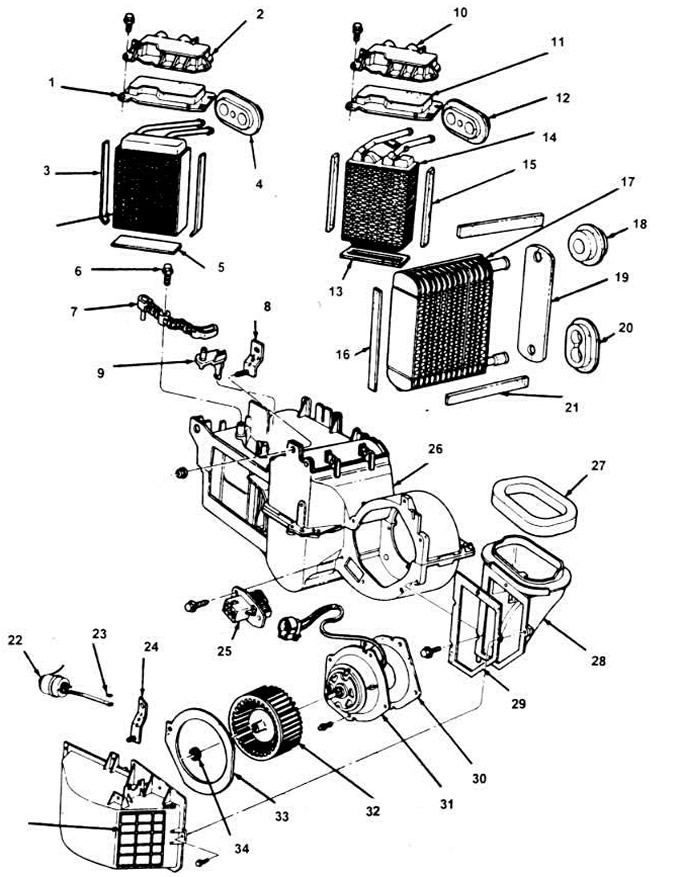
1. Heater radiator cover gasket, aluminum.
2. Additional heater radiator cover, aluminum.
3. Gasket between the radiator and the body, aluminum.
4. Seal between radiator pipe and terminal, aluminum.
5. Gasket between the body and the radiator.
6. Screw.
7. Alloy door lever.
8. Bracket.
9. Door roller made of alloy
10. Additional radiator cap, copper or bronze.
11. Radiator gasket.
12. Gasket between the pipe and the plate.
13. Lower seal of the heater radiator.
14. Heater radiator unit.
15. Gasket between the body and the radiator.
16. Right evaporator core gasket.
17. Evaporator radiator unit.
18. Air conditioner tube seal.
19. Gasket between the radiator and the evaporator body.
20. Air conditioner evaporator drain pipe gasket.
21. Lower evaporator core gasket.
22. Vacuum motor.
23. Motor lever spring nut.
24. Evaporator bracket.
25. Resistance
26. Heater body.
27. Upper air intake gasket
28. External air intake.
29. Inner gasket of the air conditioner air intake door.
30. Fan motor mounting gasket.
31. Fan motor.
32. Fan wheel.
33. Fan plate gasket.
34. Wheel locking washer.
8 Unscrew the screws securing the lower counter to the bottom of the heater/evaporator housing.
9. From the engine compartment side, remove the three nuts that secure the heater/evaporator housing to the firewall.
10. Remove the two screws securing the bracket to the top panel of the hood.
11. Carefully pull the housing with the heater evaporator out through the dashboard and out of the vehicle.
12. Disconnect the internal vacuum control valve/vacuum supply line from the heater core tube gasket (see illustration).
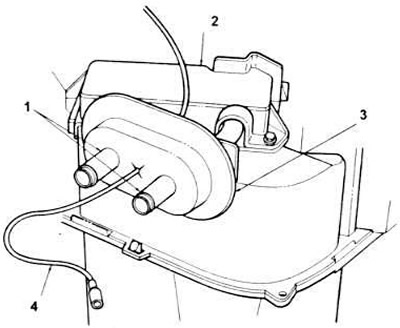
13.12. Be sure to disconnect the vacuum line with the internal check valve from the core tube gasket - pull it out of the machine body.
1. Heater radiator tubes.
2. Additional heater radiator cover.
3. Radiator pipe gasket.
4. Vacuum feed.
13. Remove the gasket from the heater radiator pipes.
14. If the vehicle is equipped with Electronic Automatic Temperature Control (EATC), remove the three screws securing the engine control door (see illustration) to the heater/evaporator housing. Remove the wire.
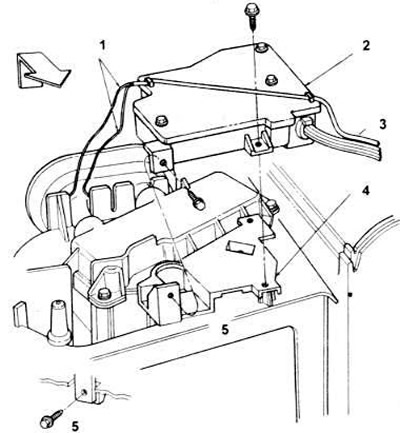
13.14. In vehicles equipped with the EATS system, to gain access to the heater core, the motor drive door must be removed from the top of the heater/evaporator housing.
1. Turn on engine cooling.
Note: When removing, disconnect the drive from the bracket, lift it 13 mm (0.5 in) first upwards and then towards the passenger compartment.
2. Motor drive door.
3. To the electrical connector.
4. Motor drive door mounting plate.
5. View A.
15. Remove the 4 screws securing the additional cover of the heater radiator and remove the additional cover from the heater body (see figure).
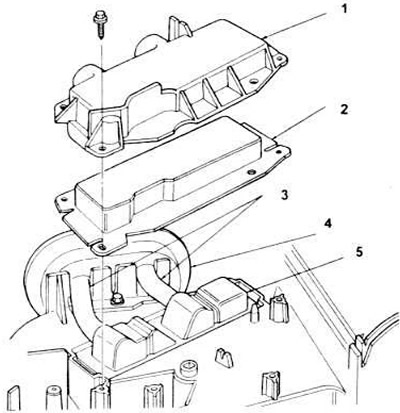
13.15. To access the heater radiator, you need to remove the additional cover and sealing gasket from the top of the heater/evaporator unit
1. Additional heater cover.
2. Additional radiator cover and gasket.
3. Heater radiator tubes.
4. Laying radiator pipes.
5. Heater radiator.
16. Remove the radiator and gaskets from the housing.
17. Transfer the three seals to the new heater core.
18. Install the radiator and seals into the housing.
19. Place the additional cover on the heater/evaporator housing, tighten the four fastening screws.
20. If the machine is equipped with the EATS system, place the door on the drive shaft. Tighten the 3 screws connecting the drive to the evaporator body.
Installation
21. Install seals on the heater radiator tubes.
22. Pass and install the vacuum check valve and vacuum line through the radiator tube seal.
23. Position the heater/evaporator assembly housing in the hood upper panel opening and the corresponding location on the instrument panel. Install the two screws to secure the brackets and hood upper panel.
24. Tighten the three nuts in the engine compartment to secure the heater housing to the firewall.
25. Secure the floor sensor to the heater body with two screws.
26. Install the heater/evaporator housing support bracket.
27. Install the instrument panel (see chapter 11).
28. If there is an air conditioner, connect the evaporator radiator hose and the choke accumulator (see section 16).
29. Connect the heater hoses to the radiator.
30. Connect the black vacuum hose to the vacuum check valve in the engine compartment.
31. Add coolant (see chapter 1).
32. Connect the negative cable to the battery.
33. Check the operation of the heating system.
34. Check for possible leaks in the air conditioning system, repair them and charge the system.