Warning 1: Before starting work, discharge the air conditioning system (contact a specialist).
Warning 2: Some 1992 models are equipped with R134 air conditioning systems. These systems have yellow tags with the words "NON - CFC" on them. Also, the compressor clutch on R134 systems is gold in color. They are very similar to R12 compressors, but are not interchangeable. Do not use R134 compressors in R12 systems, which are found on all pre-1991 models.
1. Drain the cooling system fluid (chapter 1).
2. Remove the electric fan with the casing (section 4).
3. Remove the radiator (section 5).
4. Disconnect the two lines on the right side of the condenser using a 1/2" spring lock tool (see chapter 4).
5. Unscrew the bolts securing the condenser to the radiator support (see figure), remove the condenser from the car.
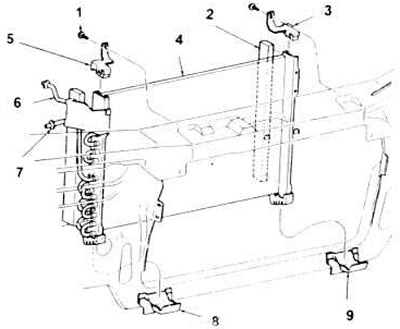
15.5. Air conditioner condenser assembly.
1. Screws with washers (1 piece for each bracket).
2. Gasket.
3. Upper left condenser support bracket.
4. Capacitor.
5 Upper right condenser support bracket.
6. Collector with tubes (discharge line comes from the capacitor).
7. Condenser tubes (to the accumulator/suction dryer, evaporator, fixed section tube).
8. Lower right condenser support bracket.
9. Lower left condenser support bracket.
6. Installation is carried out in reverse order.
7. Contact a specialist to charge the system and check for leaks.
The original version can be found on the website FordBook