Contents: Removal ↳ Installation ↳
Removal
1. With the parking brake applied, jack up the front of the vehicle and support it on jack stands.
2. Straighten and pull out the cotter pins of the ball joint nuts on both sides of the longitudinal steering rod, then unscrew and remove the nuts. Using a ball joint puller, release the ball joints, then pull out the tie rod.
3. To remove the ball joints of the longitudinal steering rod, loosen the lock nuts and unscrew the joints. Remember that on the left side they have left-hand threads and unscrew clockwise.
Installation
4. Thread the new ball joints onto the tie rod, turning each an equal number of times so that the ball stud centers are 455.0 mm apart.
5. After installing the longitudinal steering rod, tighten the ball joint nuts and secure them with new cotter pins.
6. When the wheels are in a straight-ahead position, the steering wheel should be in the middle position. Accordingly, adjust the longitudinal steering rod, and then tighten the ball joint lock nuts (see Figure 31.6.).
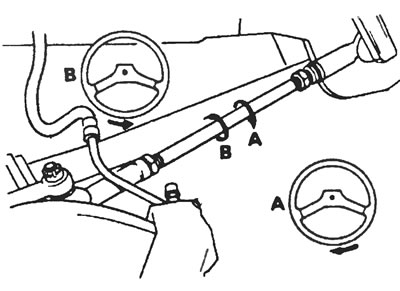
Figure 31.6. Adjust the steering linkage by setting the steering wheel to the center position.
7. Lower the car to the ground.