Contents: Examination ↳ Replacement ↳
Examination
1. Approximately every six months, the rubber hoses connected to the steel pipes of the front and rear brake assemblies should be checked for cracks, wear of the outer coating, leaks, swelling and other damage, the operation is carried out with the car raised on a lift. These are important and vulnerable parts of the braking system, so the check must be complete.
Replacement
Rubber hose
2. Clean the ends of the hose.
3. Disconnect the brake line from the hose end using a reverse wrench on the end. If necessary, wet the connections with a good penetrating oil.
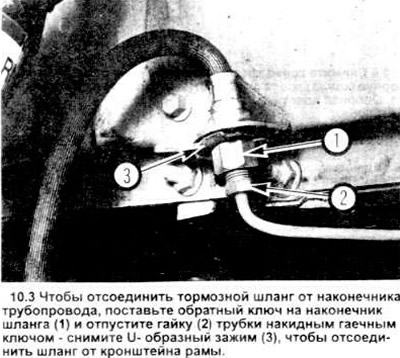
4. Unscrew the hose bracket bolts from the rack.
5. Remove the U-clamp from the female end on the bracket (see Figure 10.3), remove the hose from the bracket.
6. Disconnect the hose from the caliper, discarding the removed copper washers on each side of the tip block.
7. After installing new copper washers, connect the new brake hose to the caliper.
8. Pass the female end through the frame bracket. The hose should have some freedom of rotation, set it in the desired position (use the red paint strip to determine the possibility of rotation).
Note: The weight of the vehicle must be supported by the suspension, so there is no need to lift the vehicle to install the hose.
9. Install the U-clamp onto the frame bracket female end.
10. Using a reverse key on the tip, connect the brake system pipes to it.
11. Mount the brake hose bracket to the strut.
12. Check carefully and make sure that neither the suspension nor the steering gear parts should touch the hose. During the check, you can push the car and also turn the steering wheel from one extreme position to another.
13. Bleed the brake system as described in section 11.
Metal pipelines
14. When replacing brake system components, use correctly selected parts. Copper tubes should not be used in any brake system.
15. Use factory-made tubing with already fitted tips and connectors, bent to size.
16. When installing new pipe, make sure it is securely fastened to the bracket and has sufficient clearance for expansion when heated.
17. After installation, check the brake fluid level and add fluid if necessary. Bleed the brakes as described in section 11, check them out.