Models produced before 1992
Removal
1. Disconnect the negative battery cable.
2. Remove the air filter as described in section 3.
3. Loosen the bolts, disconnect the intake manifold connection on the turbocharger side and remove the gasket. Loosen the hose clamps and disconnect the intake manifold and hose from the intake manifold (see Figure 21.3). Disconnect the pipe from the support bracket and remove it. Cover the turbo inlet using a suitable cap or a clean rag.
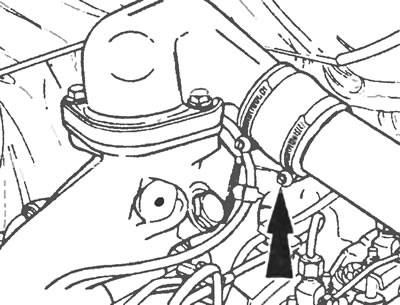
Figure 21.3. Loosen the hose clamps (indicated by an arrow) and disconnect the intake manifold from the adapter on the intake manifold.
4. Loosen the heat shield retaining nuts and bolts, lift up the headlight and windshield washer reservoir, and remove the heat shield (see Figure 21.4).
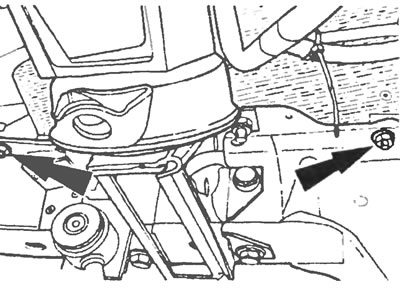
Figure 21.4. Unscrew the fixing nuts and bolts of the heat-resistant shield (the arrows indicate the lower nuts).
5. Unscrew the bolt and remove the breather tube support bracket from the exhaust manifold.
6. With the parking brake applied, raise the front of the vehicle and place it on stands.
7. Disconnect the exhaust pipe from the turbocharger. Remove the gasket.
8. After loosening the union nuts, disconnect the connections and remove the turbocharger high pressure oil line (see Figure 21.8).
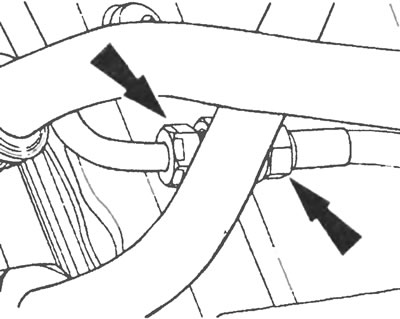
Figure 21.8. Disconnect the connections (shown by arrows) and remove the turbocharger high pressure oil line.
9. Unscrew the two bolts in the flange connection and disconnect the turbocharger oil drain line (see Figure 21.9). This will cause some oil to leak out of the turbocharger.
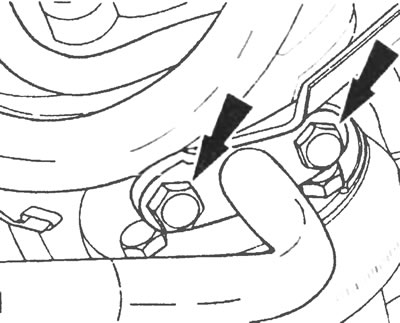
Figure 21.9. After unscrewing two bolts (shown by arrows) at the flange connection, disconnect the turbocharger oil drain line.
10. Loosen the clamp securing the oil drain line to the pan and remove the pipe.
11. Loosen and remove the turbo support bracket mounting bolts.
12. Support the turbocharger and exhaust manifold, unscrew the flange nuts securing the exhaust manifold to the cylinder head. Remove the turbocharger and exhaust manifold.
13. Unscrew the nuts and separate the turbocharger from the exhaust manifold (see Figure 21.13). Remove the gasket.
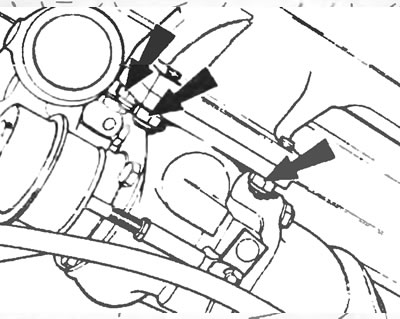
Figure 21.13. Unscrew the nuts and separate the turbocharger from the exhaust manifold.
14. Unscrew the nuts and remove the elbow pipe of the exhaust pipe and muffler in the turbocharger.
15. Unscrew the turbo oil feed pipe connection and cover the hole to prevent dirt from getting inside.
16. Thoroughly clean all mating surfaces before beginning reassembly.
Installation
17. Reinstall in the reverse order of removal, paying attention to the following points:
- a) Use new gaskets in all flange connections and new nuts in the turbocharger-to-manifold and muffler pipe-to-turbocharger connections;
- b) Apply a suitable heat-resistant lubricant to the mating surfaces of the manifold and cylinder head;
- c) When reinstalling the turbo support bracket, loosen all mounting bolts, align the bracket to ensure there is no stress on the bracket flanges, then tighten the bolts;
- d) Use new copper washers when reconnecting the high pressure oil line;
- d) Tighten all nuts and bolts to the specified torque;
- e) When finished, disconnect the wire from the high pressure fuel pump solenoid valve.
Crank the engine until the oil pressure light goes out, then reconnect the wiring to the solenoid valve and start the engine.
Models produced since 1992
Removal
18. Disconnect the negative battery cable.
19. Remove the air filter (see section 3)
20. Remove the bolts, separate the intake manifold connection from the turbocharger and remove the gasket. Loosen the clamps and disconnect the intake manifold pipe at the intake manifold (see figure 21.20). Separate the line from the support bracket and remove it from the engine. Plug the turbo inlet using a suitable cap or a clean rag.
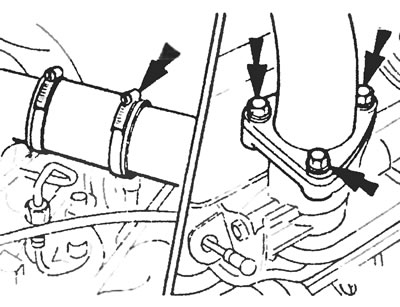
Figure 21.20. Loosen the clamps and mounting bolts (shown by arrows), disconnect the intake manifold from the turbocharger and intake manifold and remove it.
21. Remove the two bolts and the air filter support bracket from the exhaust manifold.
22. Disconnect the EGR valve multi-pin connector and vacuum hoses, then remove the two Torx bolts and the EGR valve.
23. Apply the parking brake on the vehicle, raise the front end, and place it on supports.
24. Unscrew the four bolts and remove the lower engine shield.
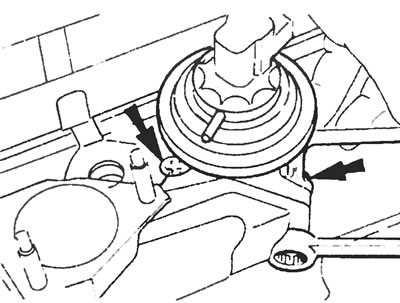
Figure 21.24. Unscrew the two Torx bolts and remove the EGR valve.
25. Remove the EGR throttle body housing.
26. Unscrew the connections and disconnect the turbocharger oil pressure and drain lines.
27. Remove the two bolts from the muffler inlet pipe support bracket near the fuel pump heat shield.
28. Unscrew the three nuts and separate the exhaust manifold pipe from the turbocharger flange.
29. Support the turbocharger and exhaust manifold, unscrew the flange nuts securing the exhaust manifold to the cylinder head. Remove the turbocharger and exhaust manifold.
30. Unscrew the nuts and separate the turbocharger from the exhaust manifold. Remove the gasket.
31. Unscrew the nuts and separate the elbow pipe from the turbocharged muffler inlet pipe.
32. Thoroughly clean all mating surfaces before reinstallation.
Installation
33. Installation is carried out in the reverse order of removal, paying attention to the following points:
- a) Use new gaskets in all flange connections and new nuts in the turbocharger-to-manifold and muffler pipe-to-turbocharger connections;
- b) Apply a suitable heat-resistant lubricant to the mating surfaces of the manifold and cylinder head;
- c) Tighten all nuts and bolts to the specified torque.
[The original article can be viewed on the portal: FORDBOOK.RU]