External handle
Removal
1. Disconnect the latch cover or remove the inner trim of the tailgate (see Section 9).
2. Unscrew the handle cover nuts (see Figure 16.2). Disconnect the license plate light wiring and remove the cover.
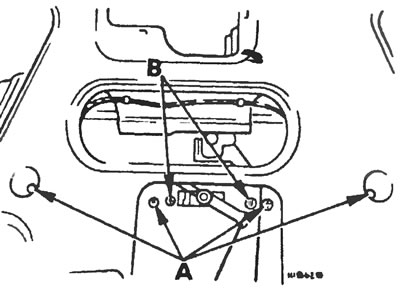
Figure 16.2. Tailgate cover nuts (A) and handle screws (B).
3. Disconnect the rod from the handle, unscrew the two mounting screws and remove the handle.
Installation
4. Install the handle in reverse order.
Lock cylinder
Removal
5. Remove the interior trim (see Section 9).
6. Remove the retainer and disconnect the lock rod.
7. Remove the spring retainer and pull out the cylinder (see Figure 16.7).
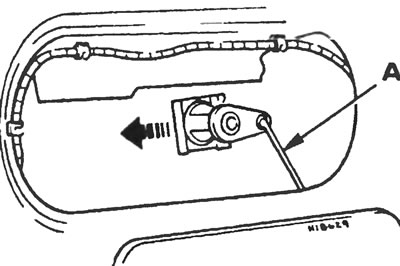
Figure 16.7. Disconnect the tailgate lock rod (A), release the latch and remove the lock cylinder.
Installation
8. Installation is carried out in reverse order. Remember that the cylinder drain hole should face down.
Latch
Removal
9. Remove the latch cover (three screws) or the inner trim of the tailgate (see Section 9).
10. Disconnect the latch rods.
11. Remove the three mounting screws, lock the latch rotor and remove the latch with rods. When installing a new latch, use the rods from the old one. Remember that even if the tabs on the retainers break during removal, the retainers themselves can still be used (see Figure 16.11).
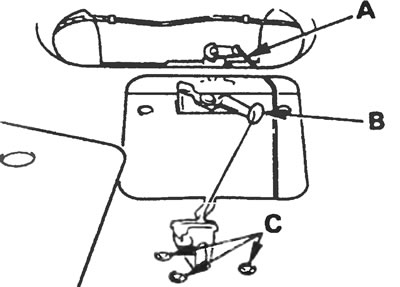
Figure 16.11. Lock connecting rod (A), handle rod (B) and tailgate latch mounting screws (C).
12. On models with central locking, the locking motor can be removed by unscrewing two screws, turning the motor shaft and disconnecting the rod.
Installation
13. The latch is installed in reverse order. Do not close the latch with a lid (or the inner lining of the tailgate), until you check that it works.