


Removal
1. With the parking brake applied, loosen the corresponding wheel nuts, then jack up the front of the vehicle and support it on stands.
2. Unscrew the nuts and remove the wheel on the desired side.
3. Unscrew the bolt and separate the bracket holding the brake hose from the shock absorber.
4. Remove the two bolts securing the brake caliper guide bracket to the steering knuckle. Please note that the top bolt cannot be completely removed due to its proximity to the shock absorber, but it can be loosened enough to allow removal of the guide bracket. Remove the guide bracket along with the caliper and brake pads and tie it in a convenient place under the wheel arch. The hydraulic hose can be left connected, but take care to avoid stretching or twisting it.
5. Using a hook, remove the protective cap from the hub, wipe off the grease, then pull out the cotter pin and remove the nut retainer. Unscrew the nut and remove the washer. Separate the hub together with the outer bearing from the steering knuckle (see figure 2.5, a, b). Please note that the hub nuts on the left side have left-hand threads and should be loosened clockwise.
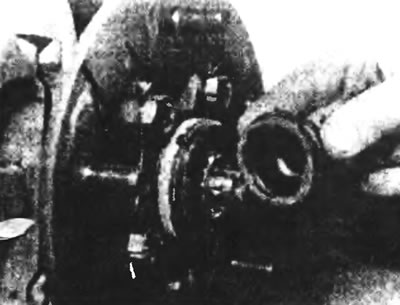
Figure 2.5a. Removing the hub boot.
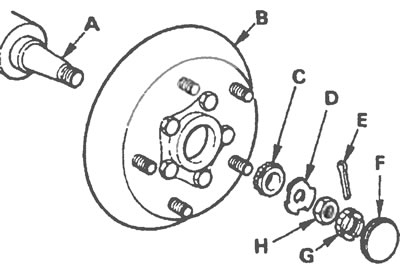
Figure 2.5,b. Details of the hub fastening to the steering knuckle: A - Steering knuckle, B - Hub, C - Outer bearing, D - Washer, E - Cotter pin, F - Dust cover, G - Nut retainer, H - Hub nut.
6. Clean the hub and bearings for inspection.
7. Inspect the outer bearing running surfaces for excessive wear and pitting. If new bearings are required, replace both the bearing cones and outer races with new ones at the same time. If the oil seal is defective, it should also be replaced with a new one. The procedures for replacing the wheel bearings and oil seal are described in Section 3.
8. If necessary, the brake disc can be removed from the hub as described in Chapter 9.
Installation
9. If removed, install the brake disc on the hub as described in Chapter 9.
10. Lubricate the hub bearings and oil seal lips with a suitable grease, then install the hub onto the steering knuckle.
11. When installing the hub, take care not to damage the contact lips of the oil seal. Slide the hub into position on the steering knuckle, then install the outer bearing cone, put on the washer and thread on the adjuster nut, but do not tighten the nut all the way.
12. After installing the guide bracket and brake caliper, tighten the retaining bolts to the specified torque (see Chapter 9 specifications). Connect the brake line to the shock absorber.
13. Install the front wheel and tighten the locking nuts to the specified tightening torque.
Regulation
14. Tighten the hub bearing adjuster nut to the specified torque. regulated by the specification. while simultaneously rotating the wheel in all directions to ensure that the bearings are seated correctly.
15. Loosen the adjuster nut by one flat, then rock the wheel by hand to seat the bearings further. Now grab the wheel at diagonally opposite points, then alternately pull the wheel towards you and then push it away from you to feel the slight play that should be present (see Figure 2.15). If the required play is not felt, unscrew the adjuster nut one more edge, then try to rock the wheel again. When checking, pull and push the wheel on both edges simultaneously, without rocking it, otherwise this may create a false impression of play.
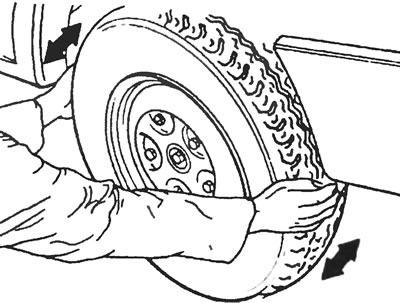
Figure 2.15. To pre-check the axial play of the hub bearings, grasp the wheel at diagonally opposite points, then alternately pull the wheel towards you and then push it away from you to feel the slight play that should be present.
16. After this, a precise check of the hub bearing play should be performed using a dial indicator (see Figure 2.16). Turn the bearing adjuster nut as necessary to achieve the specified play. When finished, secure the regulator nut with the locking pin by inserting a new cotter pin into the locking pin.
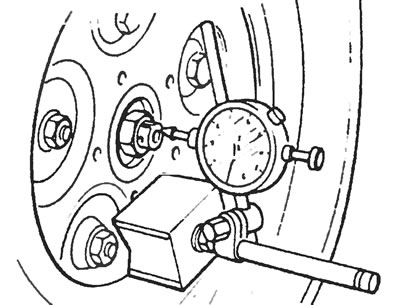
Figure 2.16. Accurate check of axial runout of hub bearings using a dial indicator.
17. Lubricate the nut with wheel bearing grease, then install the boot.
18. Lower the car to the ground.
(For more information, please visit the specified website: «fordbook»)