1. Check that the fuel tank is completely filled with fuel or, if the tank is half full, place a load of approximately 30 kg in the boot.
2. The assistant should sit in the driver's seat (or place an additional 75 kg load on the seat).
3. Check the tire pressure and adjust it to normal if necessary.
4. Place the car opposite a dark vertical wall at a distance of exactly 5 m.
5. Rock the vehicle vigorously from front to back several times to allow the suspension components to settle into their normal position.
6. Set the headlight range control to position "0".
7. Measure the distance from the ground to the center of each headlight. Mark the position of the headlight centers on the wall and connect them with a line.
8. Draw a parallel line 5 cm below it on the wall - this is the inclination of the low beam headlights at a distance of 5 m.
9. Mark the center of the car on the wall through the rear window. Have your assistant draw a vertical line exactly through the center of the car.
10. Measure the distance between the center of the car and the center of the headlights (right and left). Transfer these results to the auxiliary line on the wall (right and left from the intersection point of both other lines) and mark with crosses.
11. The bending points of the low beam headlights should be located exactly 5 cm below these crosses.
12. If the vehicle is equipped with fog lights (additional equipment), to adjust them, it is necessary to draw an auxiliary line using the method described above with adjustment crosses that determine the centers of the fog lights.
13. The headlight adjustment screws are accessible from the engine compartment.
14. Turn on the ignition and low beam headlights.
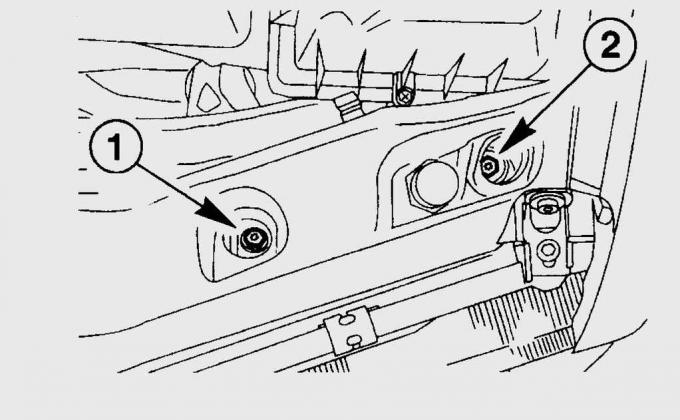
Fig. 15.28. Location of headlight adjustment screws in vertical (1) and horizontal (2) planes
15. Rotate screw 1 (Fig. 15.28) for adjusting the headlight beam in the vertical plane until the light beam coincides with the horizontal light and shadow boundary of the adjustment line.
16. Rotate headlight adjustment screw 2, located on the inside of the headlight, in the horizontal plane until the inflection point is precisely aligned with the cross. The scattering rate (approximately 15%) should be located above the horizontal line.
17. After adjusting the low beam headlights, the high beam headlights automatically correspond to the required adjustment.