Warning: These models use halogen bulbs, which contain pressurized gas. The bulbs may break if scratched or dropped. Wear eye protection and handle the bulbs very carefully, if possible, only by the base.
1. Open the hood.
2. Disconnect the negative battery cable.
3. Clear the area behind the headlight assembly, remove the retaining clip and pull out the electrical connector (see figure).
12.3. After opening the locking ring, remove the headlight bulb support flange from the bulb head - handle the bulb carefully, it is filled with gas under pressure.
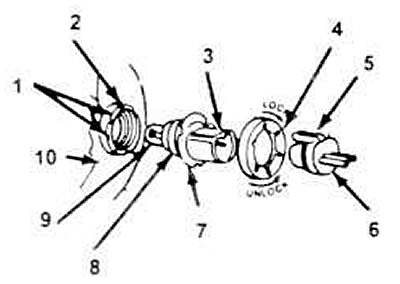
1. Back of the head.
2. Lamp head.
3. Flat side of the plastic base.
4. Retaining (snap ring).
5. Locking electrical connector.
6. Electrical connector.
7. Support flange.
8. Lamp.
9. Glass flask.
10. Reflector.
4. Grasp the bulb holder retaining ring and turn it counterclockwise to remove. To access the bulb, pull up the headlight bulb head support flange.
5. Carefully push the lamp out of the support flange, being careful not to rotate it.
6. With the flat side facing down, install the new lamp into the support flange.
7. Align the grooves on the support flange with the guide tabs on the head and insert the support flange into the headlight assembly.
8. Turn the locking ring clockwise to lock the support flange in place.
9. When installing the electrical connectors into the support flange, press down on it until the clamp engages and secures it.
10. Connect the negative cable to the battery.
(The original text is provided on an online resource Fordbook.ru)