The location of the fuse links on your specific vehicle can be determined from the wiring diagram at the end of this chapter.
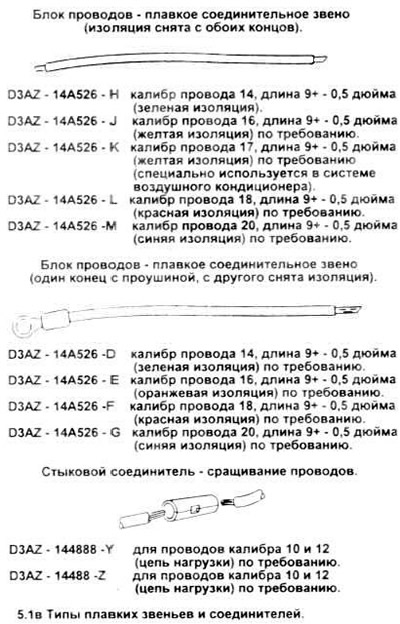
Fusible connecting links are not repairable. When replacing a link, make sure the new one exactly matches the original in gauge, length and insulation.
Warning: Do not confuse the fusible link with the resistor. The resistor wire is usually longer and has a warning label on it that says "Resister - don't cut or splice.".
Fusible connecting links of the charging system
1. Replacement of the charging system fuse is carried out as follows:
- a) Disconnect the wire from the negative terminal of the battery.
- b) Disconnect the fusible link from the wire, or disconnect the fusible link contact eye from the battery terminal of the starter relay (on some vehicles the fusible link is a loop on the outside of the wire bundle).
- c) Cut the damaged link from the wires to which it is connected.
- d) Solder a new fuse link to the wires from which the old one was cut.
- d) Carefully wrap the connection points with insulation.
- e) Securely connect the contact terminal eyelet to the battery stud on the starter relay.
Note: Some fuse links (see illustration) have a terminal eye on one end that accepts a 5/16" stud. In cases where the required contact is not available, use one of the fuse links shown with the insulator removed from both ends.
- g) Install the wires as they were before.
- c) Connect the negative battery cable.
- i) Check the operation of the circuit.
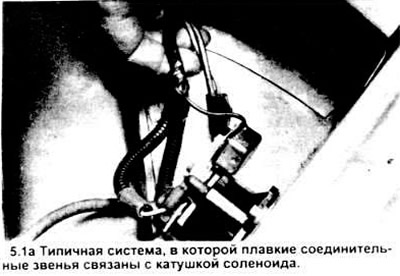
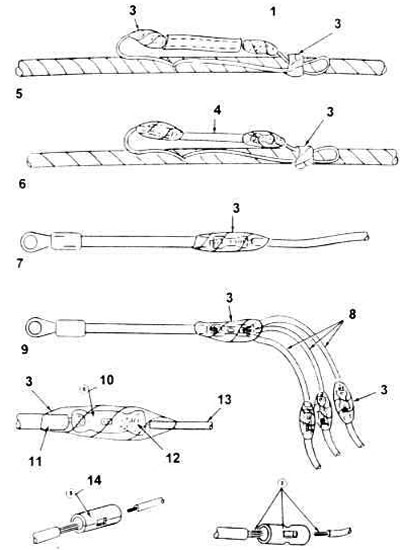
5.1, b. Parts for repairing fusible connecting links.
1. Remove the existing tubular vinyl screen.
2. Before crimping the fusible link to the wire ends, re-install it over the fusible link.
3. Electrical tape.
5. Repair using 17 gauge (9" long - yellow) fusible link for air conditioner circuits (2) 687 E and 261 A located in engine compartment.
4. Fusible link.
6. Repair option for any internal fusible link - each chain uses its own link gauge.
7. A repair option using a fuse link of a certain caliber with an eye contact.
8. Three fusible links.
9. Option for repairing the connection of three easily fusible links to one powerful gauge supply wire.
10. D3AZ - 14488 - Y butt connector for 10-12 gauge wires.
11. Wire gauge 10-12.
12. Crimping double wire.
13. Light gauge wire.
14. D3AZ - 14488 - Y butt connector for 14-16 gauge wires.
All other fusible links
2. When handling all other burnt fuse links, follow these procedures.
- a) identify the damaged chain, its location and the reason for the break of the fuse link.
- b) disconnect the negative battery cable.
- c) Cut out the damaged fuse link and discard it.
- d) determine the required fuse link, ensure that the link is connected correctly to the wiring
- d) use connectors and wires in the right places, insulate with electrical tape.
4. To replace a fuse link on an individual circuit in a wire bundle, cut out the damaged section, strip approximately 1/2 inch of insulation from both ends of the wire, and connect the replacement fuse link to the exposed circuit wires using two appropriately sized butt connectors. Insulate the connectors and wires with electrical tape.
5. When working with a fuse link that has an eye on one end (as in a charging circuit), cut out the burnt fuse link behind the solder joint, strip the wire 12.7 mm (1/2 inch) from the cut end, and connect a suitable new eye fuse link to the stripped end of the wire using a butt connector and tape.
6. Connect the wire to the negative terminal of the battery.
7. Check the system operation.
[The text is available on the specified website info portal: FORDBOOK.ru]