2. Remove the steering column opening cover.
3. Remove the two compression nuts on the side of the heater/air conditioner housing, remove the sound insulation from under the glove box.
4. Remove casings of a steering column, disconnect electrosockets of switches of a column.
5. Unscrew four lock bolts and lower down a steering column.
6. Remove dashboard trim panels (chapter 11).
7. Remove the decorative panel of the block of devices.
8. Getting under the dashboard, disconnect the speedometer cable by pressing on the flat part of the plastic connection.
9. Open the glove compartment door and press the drawer wall out so that the glove compartment can be lowered down.
10. From the cabin side, disconnect the vacuum control, electrical supply and cables from under the dashboard.
11. From the side of the engine compartment, disconnect all engine compartment connectors from the main electrical wiring block. Disconnect the rubber grommet from the dashboard and push the wires through the hole into the passenger compartment.
12. Remove the radio speaker grids built into the dashboard (see picture).
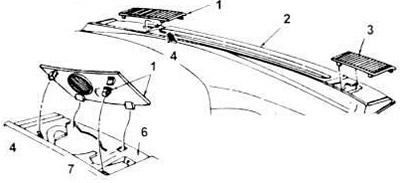
16.12. Use a small screwdriver to remove the speaker grilles from the dashboard.
1. Speaker grille.
2. Dashboard block.
3. Loudspeaker grille.
4. View A.
5. To the front of the vehicle.
6. Dashboard.
7. The installation of the left one is shown, the right one is similar.
13. Unscrew the two fixing bolts of the bottom of the dashboard to the racks (see picture).
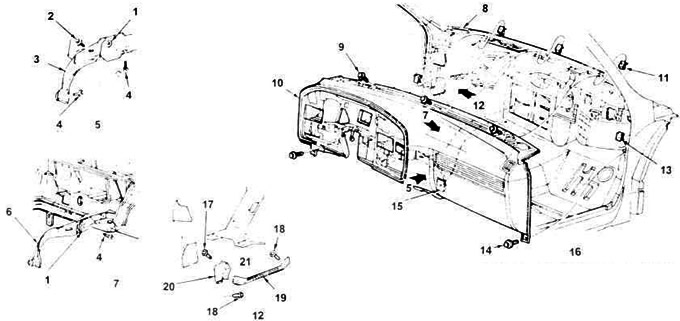
16.13. Dashboard fasteners.
1. Lower center of dashboard bracket.
2. Screw and washer.
3. Bracket that secures the dashboard to the base.
4. Bolt and washer.
5. View.
6. Bracket block securing the dashboard to the base.
7. View B.
8. Vehicle identification plate.
9. Screw (3 pieces).
10. Dashboard block.
11. Y-nut (3 pieces).
12. View C.
13. U-nut, 1 per side.
14. Screw 1 piece on each side.
15. Bracket for fastening the dashboard to the base.
16. Installation shown for Tauras model, installation for Sable is similar.
17. Bolt (2 pieces).
18. Bolt.
19. Steering column bracket block.
20. Steering column bracket retainer.
21. Only for 2.5L.
14. Unscrew the fixing bolt of the dashboard support, located under the radio.
15. Unscrew the three bolts securing the top of the dashboard.
16. Move dashboard back from hood, disconnect any remaining wiring and/or heater/air conditioner connectors; remove the assembly from the vehicle.
17. Install in reverse order.
Visitor comments