A rough test of the thermostat's functionality can be done using a glass container filled with water and a thermometer.
1. Remove the thermostat.
2. Hang the thermostat on a thread in a glass vessel filled with water and heat the water until it boils, while the thermostat should not touch the walls of the vessel.
3. Check whether the thermostat valve opens and visually determine its stroke.
4. The thermostat installed on the Omega car engines should begin to open at a temperature of 85–90°C and open completely at a temperature of 99–102°C.
5. A thermostat that does not close when the water cools must be replaced.
WARNING
A thermostat stuck in the closed position can cause the engine to overheat, causing the coolant to boil and its cooling effect to be insufficient to maintain the required engine temperature. If this happens while driving, do not continue driving under any circumstances. To avoid further damage, tow the car to the nearest auto repair shop.
constant control
SEQUENCE OF WORKS
1. To relieve pressure in the cooling system, open the expansion tank cap. Be careful when working on a hot engine - there is a risk of getting burned!
2. Place a clean container under the radiator and loosen the clamp securing the lower radiator hose or unscrew the cap on the lower radiator tank. Drain approximately 3 liters of coolant.
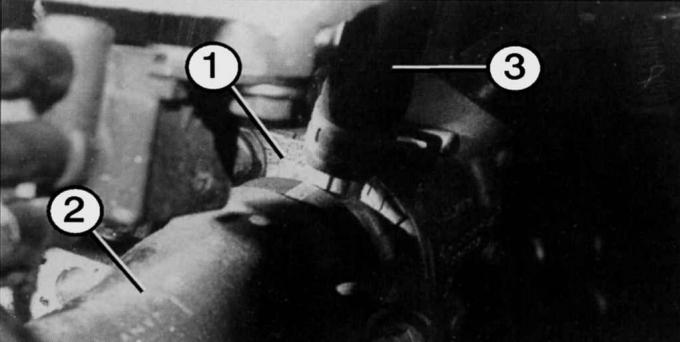
Fig. 6.6. Thermostat connection elements: 1 – thermostat housing with hose connection; 2 – Upper coolant hose; 3 – hose going to the expansion tank
3. Loosen the hose clamp on the thermostat housing and remove the hose (Fig. 6.6).

Fig. 6.7. Location of the thermostat housing on a 1.3 L engine
4. Loosen the thermostat housing mounting bolts and carefully remove the housing. If the housing is tight, knock it off using light blows from a plastic or rubber hammer (Fig. 6.7).
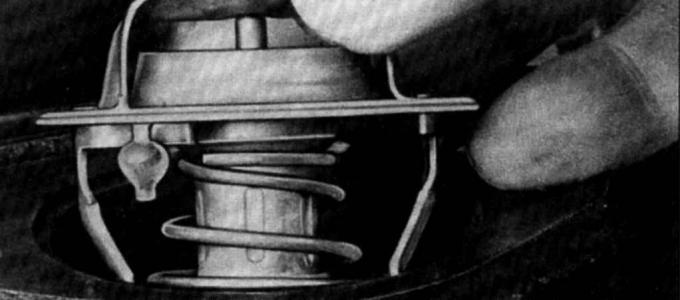
Fig. 6.8. Fiesta engine thermostat. The design of the thermostat is the same on all engine versions, only the opening temperatures of the thermostat valve differ
5. Carefully clean the mating surfaces, install the thermostat in the housing, while the arrow on the thermostat housing should be directed towards the radiator, apply a thin layer of sealant on both sides of the gasket and secure it to the flange (Fig. 6.8).
6. Carefully install the cover onto the body, apply a little sealant between the cover and the bolts, insert the bolts and tighten them evenly.
7. Secure the hose, fill the cooling system with the drained coolant, and add fresh coolant if necessary.
8. Start the engine and check the cooling system for leaks. Install the cap on the expansion tank.