SEQUENCE OF WORK
1. Open the hood and place a clean rag under the corners to protect the vehicle's paintwork when removing the hood.
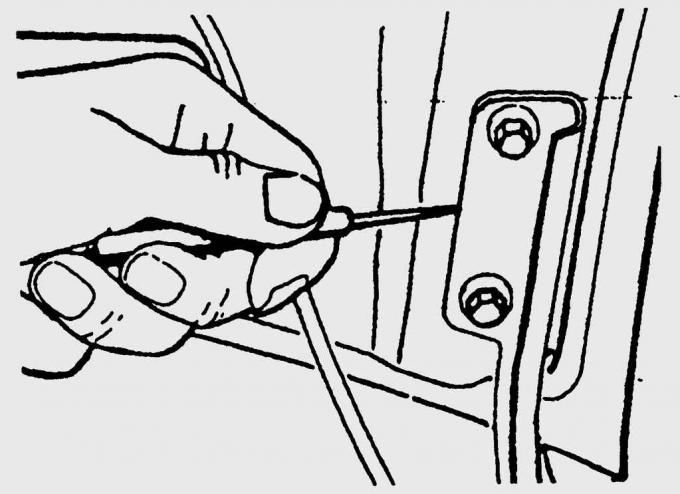
Pic. 17.5. Hinge position markings on the hood
2. Mark the positions of the hinges on the hood with a marker (pic. 17.5).
3. Release the washer hoses from the hood mounts and carefully remove from the washer jets.
4. Ask assistants to hold the hood in the open position on both sides, unscrew the bolts securing the hinges to the hood and remove the hood.
5. Using two people, install the hood and screw in the hood hinge bolts by hand, aligning the hood hinges in accordance with the previously made marks
6. Close the hood and adjust its position. Carefully open the hood and tighten the hood bolts.
Hood adjustment
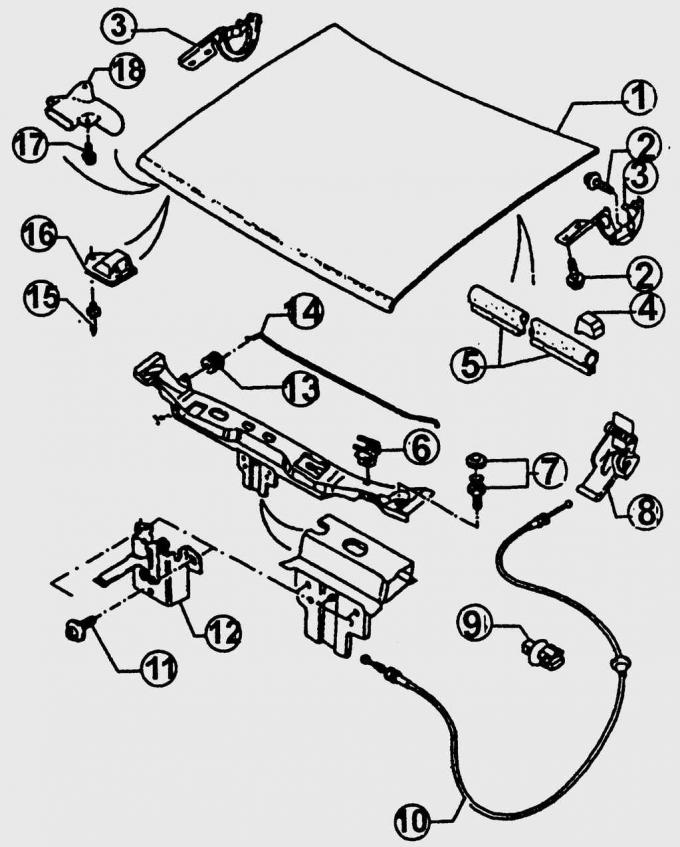
Pic. 17.6. Hood: 1 - hood; 2 - a bolt with a U-shaped washer; 3 - hood hinge; 4, 5 - gaskets; 6 - mounting clip; 7 - rubber stop; 8 - lever for opening the hood lock; 9 - clamp for fastening the cable for opening the hood lock; 10 – a cable of opening of the lock of a cowl; 11 - bolt with U-shaped washer; 12 - hood lock; 13 - rubber insert; 14 - hood stop; 15 - rivet; 16 – fastening of an emphasis of a cowl; 17 - bolt with U-shaped washer; 18 - air intake
Before installing a new hood, rearrange the parts from the old hood to it (pic. 17.6).
SEQUENCE OF WORK
1. Loosen the lock and hood hinge bolts.
2. Close the hood and check its location relative to adjacent surfaces. Adjust the position of the hood so that when the hood is closed, the gap around the perimeter of the hood is the same on all sides.
3. From the left and right front sides, screw the rubber stops into the hood.
4. Close the hood and, pressing its lock, set the hood flush with the wings. After that, unscrew the rubber stops so that the hood in the closed position has a minimum preload.
5. Tighten bolts of fastening of the lock of a cowl and bolts of fastening of hinges. Close the hood and readjust if necessary.
6. From a height of about 20 cm, release the hood - under the influence of its own gravity, the hood should completely close. At least at a low height, the hook should snap into place. Otherwise, slightly lift up the hood latch.
Bonnet release cable replacement
The hood lock is opened by a cable from the hood lock to the passenger compartment through the left side of the engine compartment and the engine compartment partition. The cable is attached to the left next to the steering column to the hood lock opening lever (see fig. 17.6).
SEQUENCE OF WORK
1. Mark the position and remove the hood latch.
2. Remove the hood release cable from the top cross member.
3. Disconnect the hood release cable from the hood release lever.
4. Tie a thin long cord to the cable. Pull the hood release cable into the vehicle interior and untie the cord from it, leaving it in the engine compartment bulkhead. In the future, the cord will be required to retract the cable to open the hood lock into place.
5. Tie the hood release cable to the cord and pull it out of the car interior through the partition of the engine compartment. Attach the new cable to the hood release lever.
6. Lay the cable in the engine compartment and secure it to the hood latch.
7. If necessary, after installing the hood lock, adjust the position of the hood.
PRACTICAL ADVICE
Broken bonnet release cable
If the cable breaks on the opening lever in the cabin, try to grab the end of the cable with pliers or pliers and pull it out. If the cable breaks near the hood lock, grab the lock lever with a strong wire hook through the gap between the hood and the radiator lining and pull to the right. The hook will open easily if at this moment you lightly press on the hood in the area of the lock.
Visitor comments