Contents: Removal ↳ Installation ↳
Removal
1. Remove the propeller shaft as described in Section 3 or 4, depending on its type.
2. Before removing the joint, mark the relative position of the cardan shaft and the sliding sleeve.
3. Place a clamp made from two hose clamps connected together onto the connection and tighten it until they begin to compress the rubber band.
4. Unscrew the six nuts, remove the bolts and separate the joint from the cardan shaft and sliding sleeve (see figure 6.4).
5. Carefully inspect the joint for defects and replace it if necessary.
Installation
6. Lubricate the guide bearing in the sliding sleeve and the corresponding journal on the drive shaft thoroughly with grease.
7. Align the pre-made marks on the cardan shaft and sliding sleeve, install the joint and insert the bolts. Securely fasten the assembly with the lock nuts.
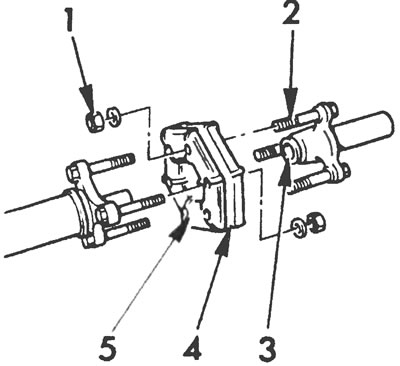
Figure 6.4. Guibo type joint of the cardan shaft:1. Self-locking nut, 2. Bolt, 3. Guide support, 4. Steel band, 5. Gui hinge
8. If you did not change the hinge, remove the clamp. If a new part was installed, cut and remove the metal band.
9. Install the propeller shaft as described in Section 3 or in the Section 4.
This publication was borrowed from the website (FORDBOOK)