Contents: Removal ↳ Installation ↳
Removal
1. Working in the cab, pry and remove the rubber retaining ring from the shock absorber cover, then separate and remove the halves (see Figure 19.1).
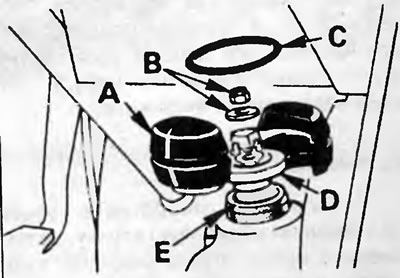
Figure 19.1. Fastening the upper part of the front shock absorber: A - Lid halves. B - Nut with washer, C - Retaining ring, D - Upper retainer, E - Cushion.
2. After unscrewing the upper shock absorber nut with the washer, remove the upper retainer (and an insulating gasket, if necessary).
3. Working under the front of the vehicle, unscrew the lower shock absorber eye nut and remove the washer. Remove the lower eye pin and remove the shock absorber (see Figure 19.3).
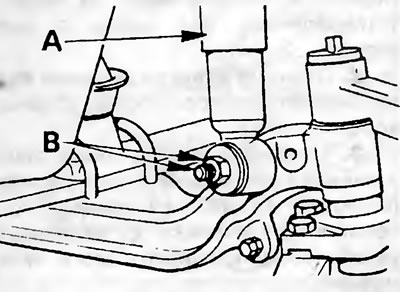
Figure 19.3. Lower mount of the front shock absorber on the front axle beam: A - Shock absorber, B - Nut, washer and bolt.
4. If the shock absorber is leaking or has defects, it must be replaced with a new one (the shock absorber cannot be repaired). To check the operation of the shock absorber, clamp it in a vice, then fully press in and out the piston several times. If the shock absorber's resistance has noticeably weakened or if it is uneven, the shock absorber should be replaced with a new one. It is advisable to replace both front shock absorbers at once, otherwise the replacement will adversely affect the steering and cause overloads.
5. The rubber bushing of the lower eye should be inspected for wear. If necessary, it can be pressed out or pulled out and replaced with a new one. Lubricate the new bushing with washing fluid to make it slippery, then press it into the eyelet so that the bushing protrudes equally on both sides of the eyelet.
6. If the upper rubber bushing is still on the body, inspect it for damage or excessive wear. To remove the bushing, use something to support it or cut it out if necessary.
Installation
7. Clean the hole in the body for the upper rubber bushing, then lubricate the new bushing with cleaning liquid and insert it into the hole, pressing and screwing it in.
8. Position the lower retainer on the top of the shock absorber, aligning the "D" shaped hole with the flat on the piston rod.
9. After inserting the shock absorber into the hole in the body, install the upper retainer, washer and mounting nut. Lubricate the top retainer with cleaning fluid to make it easier to install. It should be noted that the upper retainer can only be installed in one direction due to the fact that the hole for the shock absorber is shaped like the letter "D", and there is a corresponding chamfer on the shock absorber piston rod. After installing the locking nut, tighten it "by hand" at this stage.
10. Rotate the upper retainer and piston rod so that the arrow mark on the upper surface of the retainer (for the right side, the one marked with the letter "R", and for the left side, the one marked with the letter "L") points toward the front of the vehicle (see Figure 19.10).
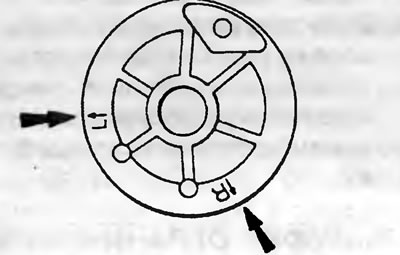
Figure 19.10. Upper shock absorber retainer alignment marks ("L" and "R").
11. With the upper retainer and piston rod correctly oriented, tighten the upper retainer nut to the specified torque.
12. Install the shock absorber cover halves and retaining ring.
13. Connect the lower shock absorber mount and tighten the retaining nut to the specified torque.
[This article is a copy from the website Fordbook.ru]