Contents: Removal ↳ Installation ↳
Warning: If suspension or steering fasteners are lost or loosened, they must be replaced with new ones; do not reuse them. Fasteners are replaced with new ones of the same design quality and marking.
Removal
1. Loosen the wheel nuts, lift the car, place it on stands. Block the front wheels and remove the rear wheel.
2. Place a floor jack under the outer end of the lower control arm and raise it to its normal height.
3. Unscrew the brake hose bracket from the frame (see figure 17.3).
4. Unscrew the stabilizer bracket from the lower suspension arm (see section 10).
5. Unscrew the lower nuts securing the shock absorber (see section 16).
6. Unscrew the bolt securing the parking brake cable to the lower arm.
7. Unscrew the bolt and nut securing the reaction rod to the lower arm (see section 20).
8. Secure the upper arm and brake drum assembly with shaft to the frame with wire so that they do not fall.
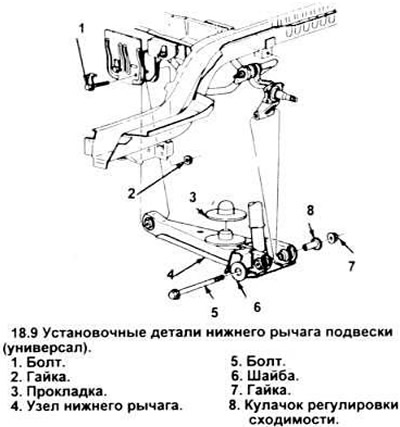
9. Mark the location of the toe-in cam relative to the rear lower control arm. This will ensure proper toe-in of the rear wheel after assembly. Remove the nut and bolt securing the lower control arm to the knuckle. Remove the toe-in cam and washer (see illustration).
10. Slowly lower the floor jack until all tension is released from the spring, then remove the spring and lower shim from the lower arm.
Installation
11. Check the spring pads for damage, replace if necessary. Check the spring for wear and serious nicks, replace if necessary. Insert the spring seat (base) into the lower arm.
12. Place the top spacer on top of the coil spring and insert the spring into the lower arm pocket.
13. Install the lower arm to its normal position, while simultaneously guiding the coil spring into the upper pocket on the frame.
14. Remove the wire supporting the upper control arm and knuckle and set it aside. Install the bolt securing the lower control arm to the knuckle, the toe-in cam washers and nut - the bolt head should be facing the front of the car, do not tighten the fasteners yet.
15. Install the power stand, but do not tighten the bolts.
16. Install the lower shock absorber support nuts and tighten them securely.
17. Connect the stabilizer bracket to the lower arm and tighten the bolt.
18. Connect the parking brake cable bracket to the lower arm and tighten the bolt.
19. Place the pipe bracket on the frame, install the mounting bolt and tighten it.
20. Raise the lower arm to its normal height, tighten all fasteners to the required tightening torque.
Note: Before tightening the nut and bolt that secure the lower control arm to the knuckle, make sure that the previously applied marks on the toe-in adjustment cams and the lower control arm are aligned.
21. Install the wheel and nuts. Lower the vehicle, tighten the nuts to the specified torque.
22. Check and, if necessary, adjust the toe-in of the rear wheels.
(The text of the article was copied from the website: FordBook)