


Contents: Removal ↳ Installation ↳
Removal
1. Remove the additional rear compartment panels.
2. Loosen, but do not remove, the upper shock absorber mounting nut (see illustration). Use locking pliers to hold the shock absorber rod from turning.
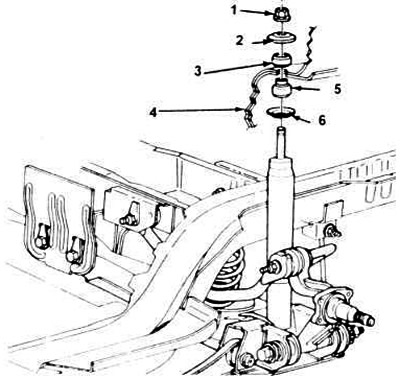
16.2. Rear shock absorber mounting parts (station wagon).
1. Nut
2. Washer.
3. Pillow.
4. Body cup.
5. Pillow.
6. Washer.
3. Loosen the wheel nuts, lift the car, place it on stands. Block the front wheels and remove the rear wheel.
4. Place a floor jack under the lower control arm and lift it slightly (enough to remove some of the weight). Unscrew the two lower nuts securing the shock absorber - from under the lower arm (see picture).
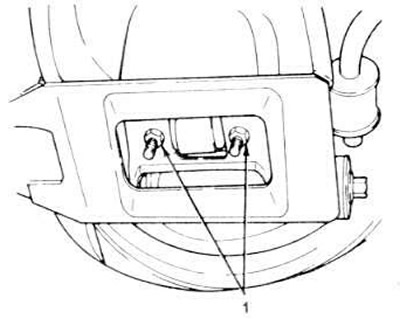
16.4. The lower shock absorber mounting nuts are located below the lower arm (station wagon).
1. Nuts.
5. Unscrew the upper shock absorber mounting nut and remove it from the vehicle.
Installation
6. Check the rubber cushions for cracks and wear. Replace any worn parts.
7. Place the disc washer and rubber cushion on the shock absorber rod, guide the shock absorber into the socket, inserting the shock absorber rod into the hole in the frame.
Compress the shock absorber and install its lower end into the lower arm. Tighten the nuts securely.
8. Install the upper rubber cushion, washer and nut. Tighten the nut securely.
9. Install the wheel, screw on the support nuts. Lower the car and tighten the nuts to the required tightening torque.
This article was borrowed from the website [Fordbook.ru]