Contents: Removal ↳ Installation ↳
Warning: If suspension or steering fasteners are lost or loosened, they must be replaced with new ones; do not reuse them. Fasteners must be replaced with new ones of the same design, quality and marking.
Removal
1. Loosen the wheel nuts, lift the car, place it on stands. Block the front wheels and remove the rear wheel.
2. Place a floor jack under the lower arm and raise it to the normal height. Unscrew the bolt and nut securing the trailing arm to the lower arm (see figure).
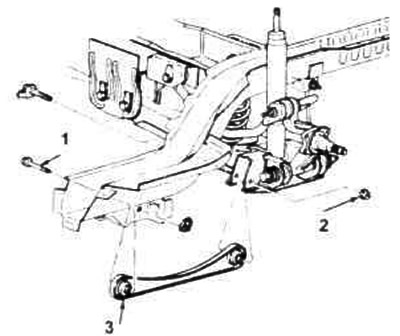
20.2. Installation parts of the universal thrust).
1. Bolt.
2. Nut.
3. Install the thrust rod.
3. Unscrew the nut and bolt securing the torque rod to the frame and remove the torque rod from the vehicle.
Installation
4. Place the torque rod into the frame bracket, tighten the bolt and nut, but do not tighten them.
5. Insert the rear of the reaction rod up into the lower arm, install the bolt and nut, tighten the nut to the required tightening torque.
6. Tighten the bolt securing the reaction rod to the frame to the required torque.
7. Install the wheel and lower the vehicle. Tighten the nuts to the specified torque.
8. If the torque rod has been replaced with a new one, the toe-in of the rear wheels should be checked and, if necessary, adjusted.
(The original text is provided on an online resource: «FordBook»)